Exploring the Depths of Network Monitoring and Troubleshooting
We will complete the following tasks:
• Explore network address configurations
• Manage a DHCP client
• Conduct a network scan
• Capture network traffic
Gathering Network Information
First and foremost, let's retrieve crucial information about the computer we are currently using, specifically the DC10 workstation, which serves as the domain controller. We will proceed by executing the following three commands to obtain the IP address, MAC address, and other relevant information:
• Get-NetAdapter
• Get-NetIPConfiguration -Detailed
• ipconfig /all
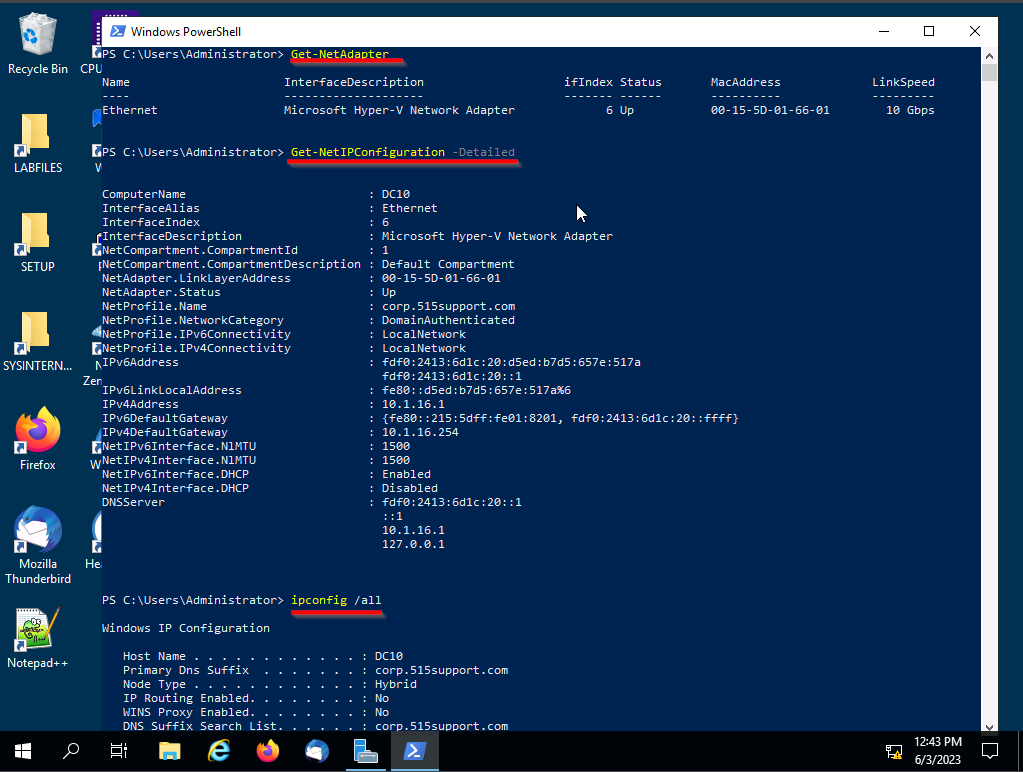
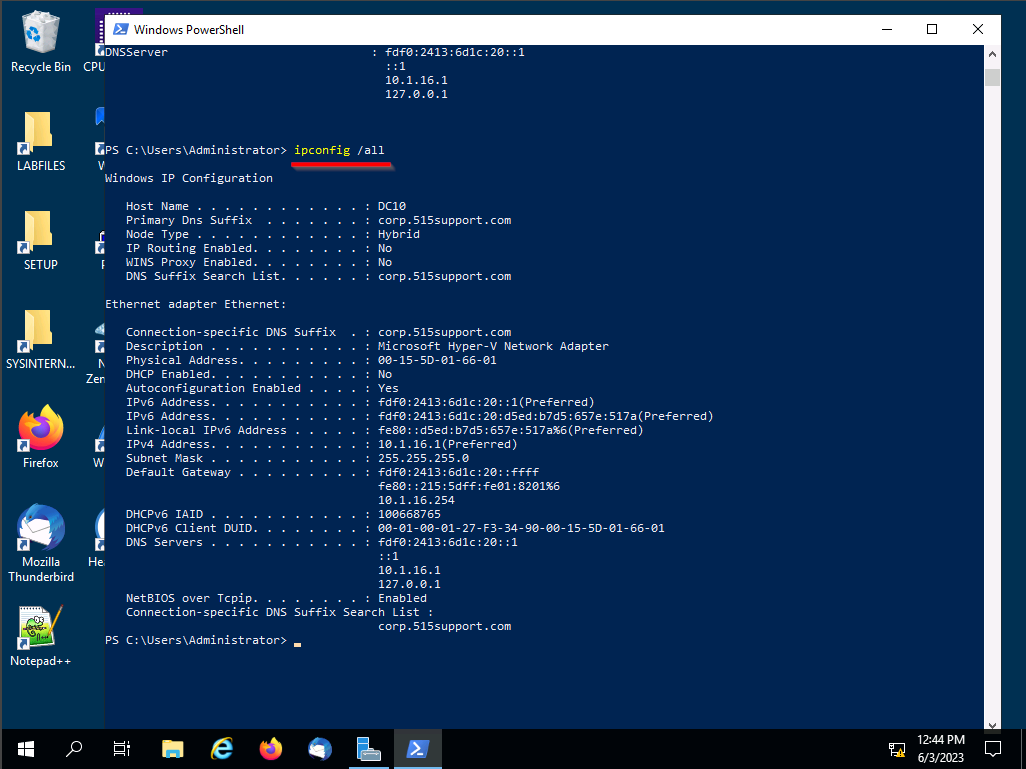
Note that our DC10 ip is: 10.1.16.1
MAC: 00-15-5D-01-66-01
The MAC and IP will be how we identify the DC10 station.
Next, we will proceed to test our connections with other devices and retrieve information from them as well. To accomplish this, we will employ the "Ping" command to check the connectivity, and we will utilize Wireshark to monitor the network traffic.
In Wireshark use ARP and ICMP filters
To use 2 or more filters in Wireshark use the "or" command.
ARP = Address Resolution Protocol, this protocol enables us to obtain both the MAC and IP addresses associated with the devices involved in the network communication.
ICMP = Internet Control Message Protocol, we can access valuable information related to ping requests and their associated details. This protocol enables us to gather insights into the status and characteristics of the network connectivity, facilitating a deeper understanding of the network's behavior.
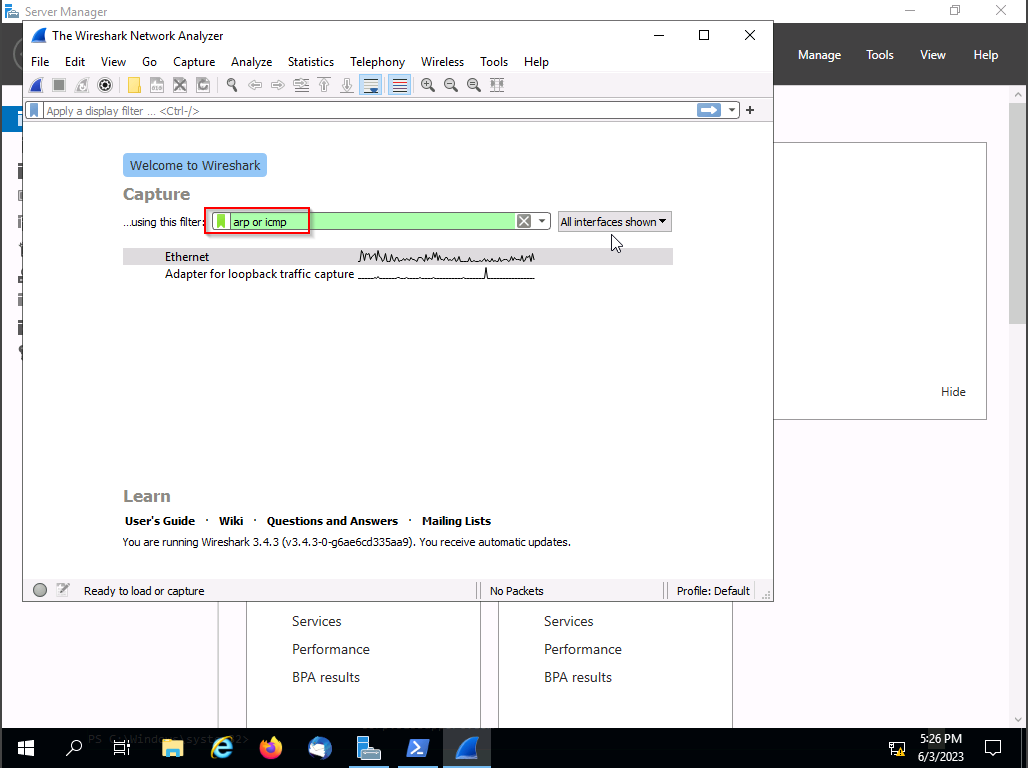
Let's initiate the packet capture to monitor network activity. To begin, please open PowerShell and execute the Ping command to communicate with the MS10 device.
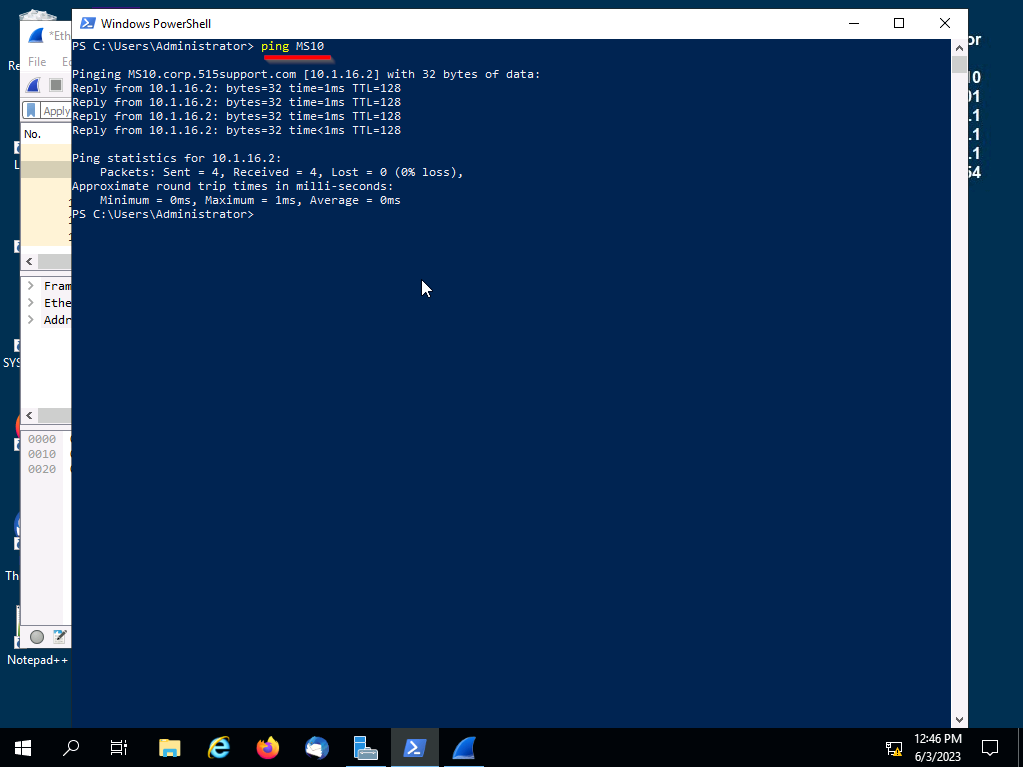
Once the Pings have been requested, stop the packet capture on Wireshark.
When analyzing the ICMP packets we are given various information but for now we will focus on IP and MAC. When analyzing this data we can see the type of requests whos the sender and more.
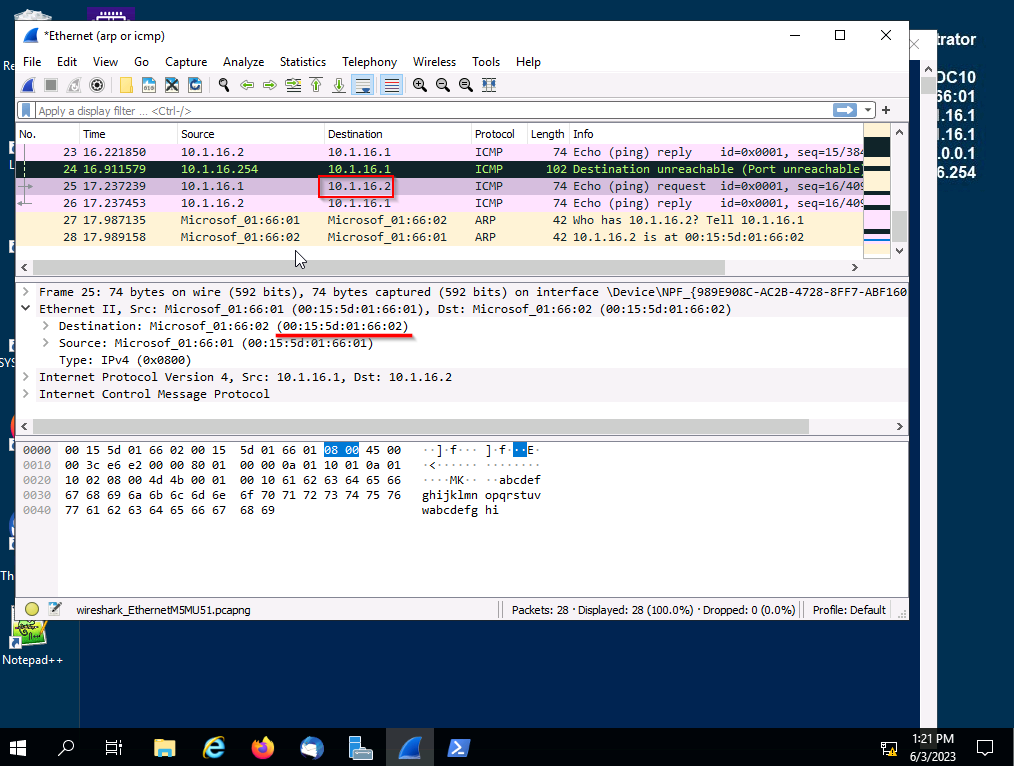
With a simple ping and some packet analysis we know that MS10's:
• MAC: 00:15:5d:01:66:02
• IP: 10.1.16.2
Managing a DHCP Client
We are now on a workstation that is on a business environment. Lets see if the PC is a client of a DHCP server.
Run: ipconfig /all
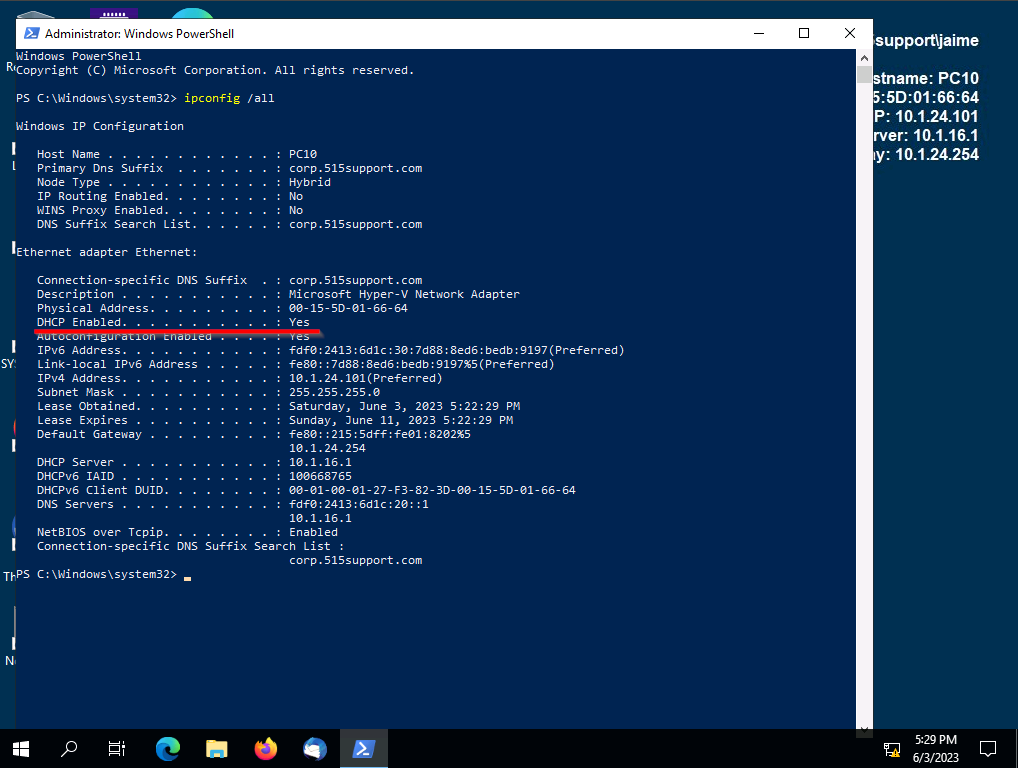
We can see that the PC is a DHCP client and is running perfectly fine. We will now simulate a DHCP failure. In our DC we will go to our servers DHCP service and stop the service.
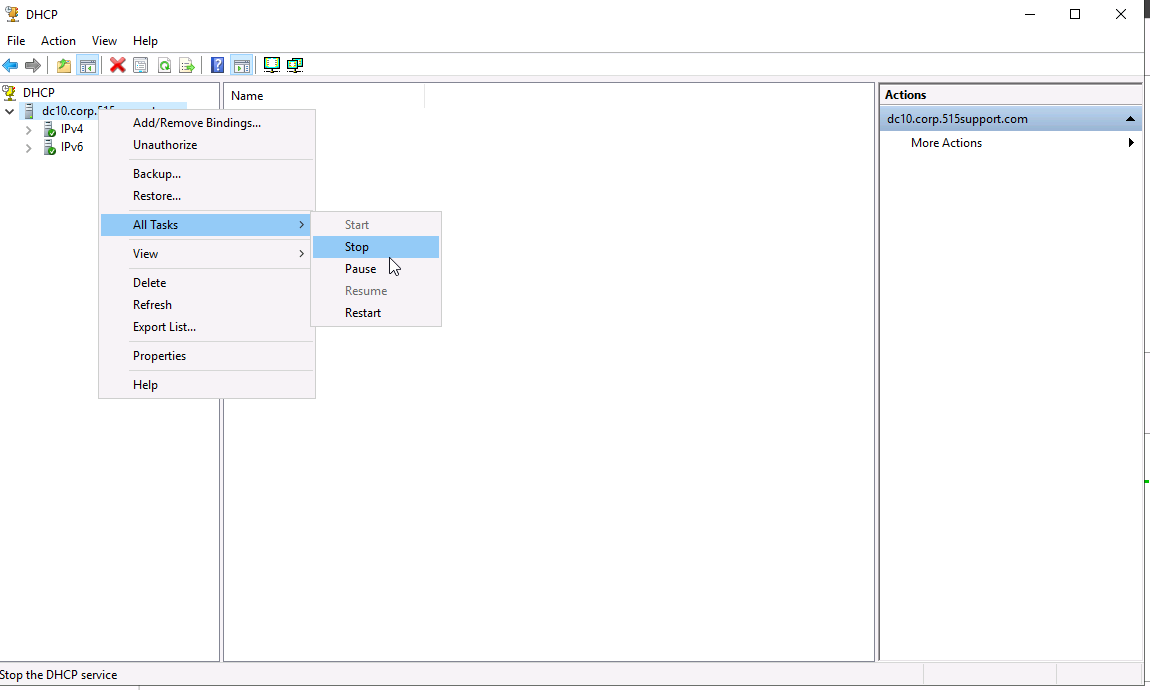
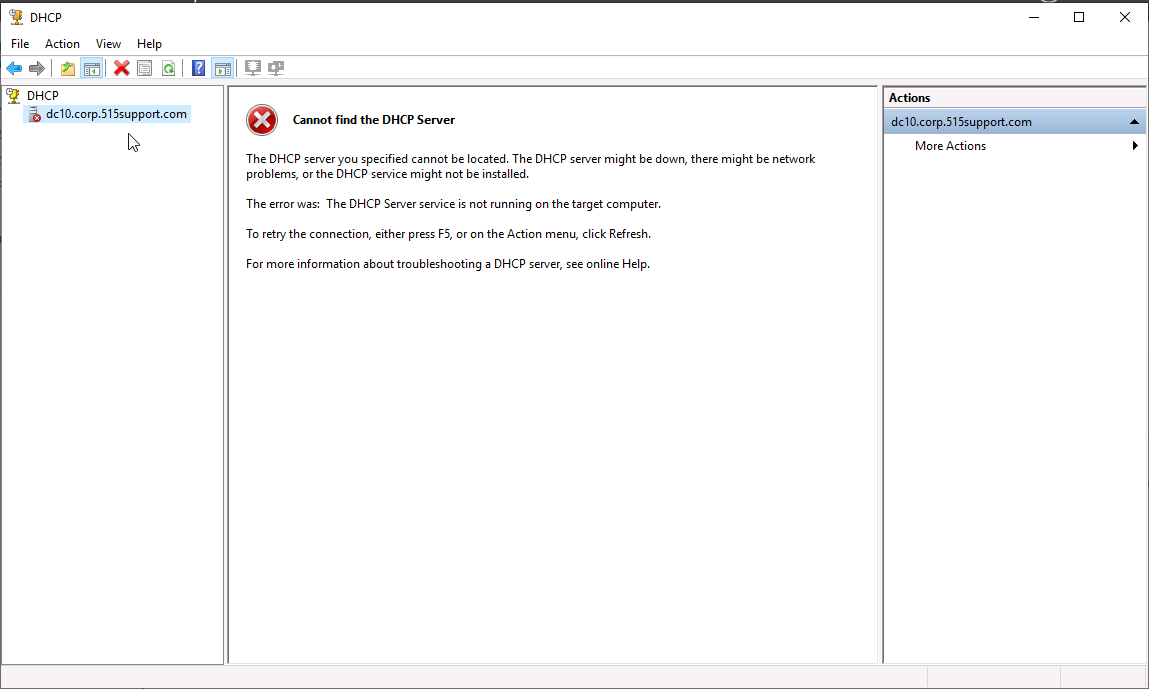
Now that the client is down on PC10 we will request a new ip from the server. Run:
ipconfig /release
ipconfig /renew
ipconfig /all
It may take a few minutes to recieve a new IP.

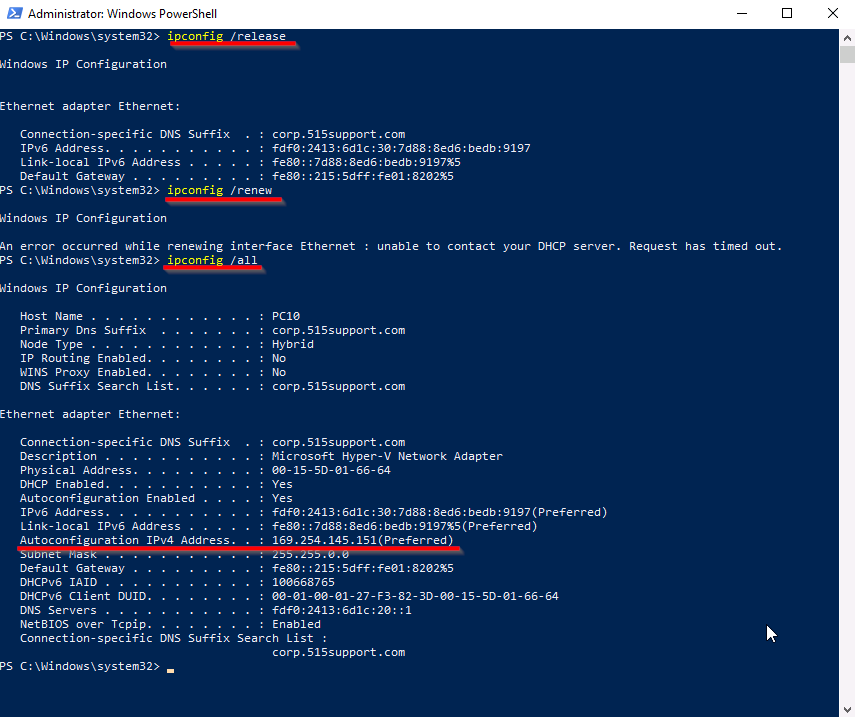
If you notice that the newly assigned IP address is in a format known as Automatic Private IP Address (APIPA), it indicates that the DHCP server may be down or the PC is unable to reach the DHCP service. APIPA is a feature in Windows that allows devices to assign themselves an IP address in the range of 169.254.0.1 to 169.254.255.254 when they fail to obtain a valid IP address from a DHCP server.
To resolve the issue, let's switch back to the DC10 Workstation and reactivate the DHCP service. After restarting the service, you can repeat the mentioned steps to obtain a new IP address. This will ensure that the PC can successfully communicate with the DHCP server and acquire a valid IP configuration.
Conduct a Network Scan
We will utilize Nmap, a network scanning tool that enables the discovery of hosts and services on a computer network. By sending packets and analyzing the resulting responses, Nmap provides valuable insights into the network's structure and the services running on it.
We will conduct a "Regular Scan" on "MS10"
In the GUI version of Nmap, you have the convenience of selecting the desired type of scan by simply clicking on the available options. This user-friendly interface allows for easy customization of the scan parameters. Additionally, the GUI version provides the flexibility to manually enter commands similar to working with a Linux operating system, enabling more advanced users to have precise control over the scanning process.
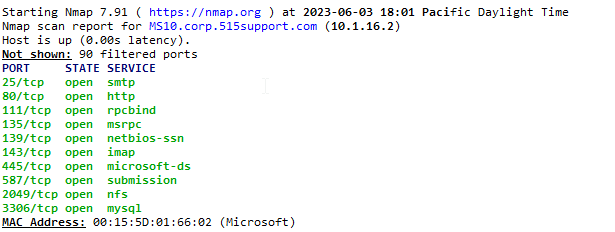
After running Nmap, we can observe that it has provided us with both the IP and MAC addresses, as well as information about open ports and associated services. Based on the results, we can determine that a total of 11 ports are open. Furthermore, we can make an assumption that this might be a messaging server due to the presence of open ports 25 and 143, which are commonly used for email (SMTP) and IMAP services, respectively.
In Nmap we are not limited to just one target. We can also target an entire network. We will do a "Quick Scan" on "10.1.16.0/24"
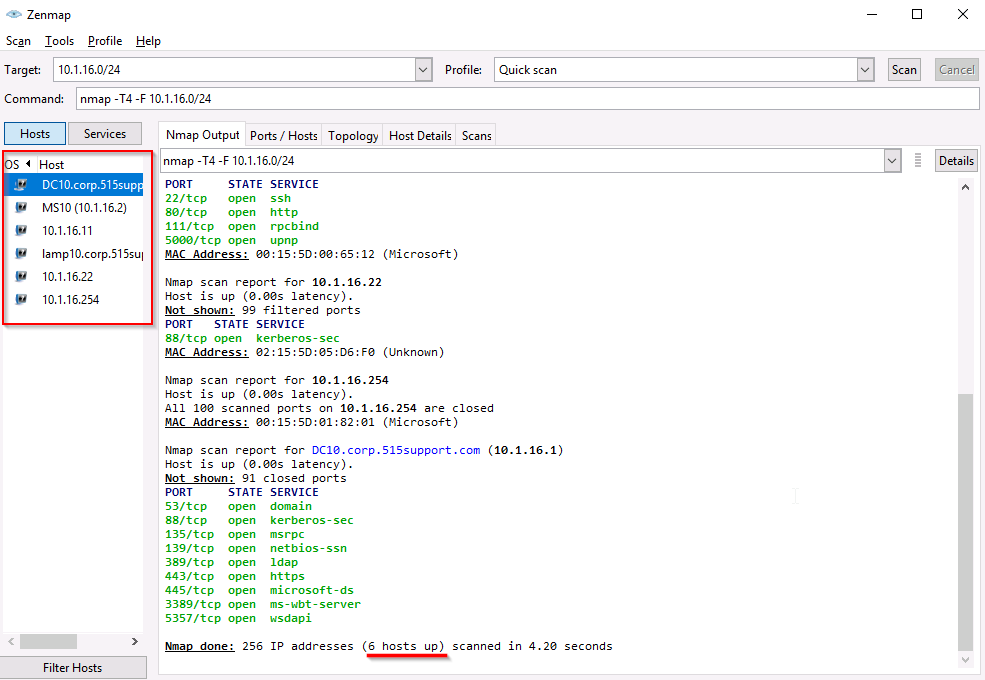
We have received the same information as in the previous scan, along with the count of active hosts. This count gives us an overview of the number of responsive devices on the network. However, it's important to note that our exploration with Nmap has only scratched the surface of its capabilities. The tool's power becomes evident as we delve deeper into its features and functionalities. Nmap is undeniably an essential and indispensable tool that should be present in every professional's toolbox, given its remarkable potency and versatility.
Examine Network Traffic
We will now capture and examine network traffic including ping, HTTP, and SSH packets.
We will log into our LAN10 switch. We want to target devices that are associated with the 10.1.16.0 Network so we have to figure out which ethernet port is associated with the network. Run:
ifconfig
or
ifconfig eth0 (can replace target with eth1, eth2, eth3, lo).
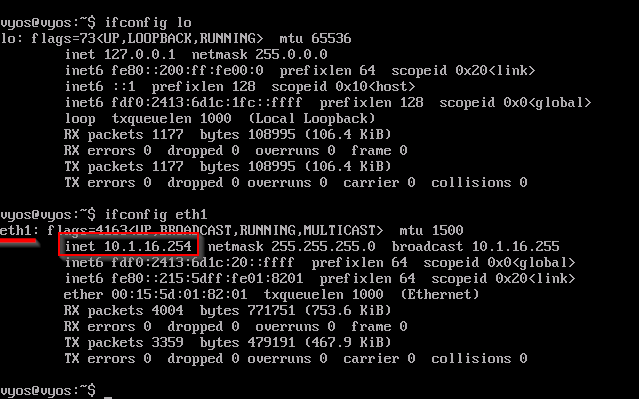
once you figured out which interface the network is connected to we will use "tcpdump" to monitor the network. Run:
tcpdump -i eth1 'ip'
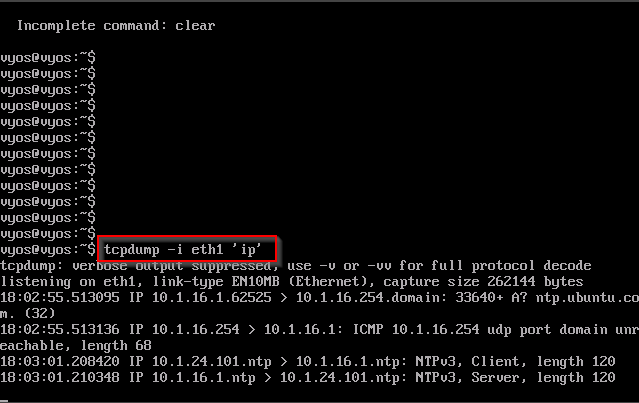
On another PC ping the IP of the router, once completed go back into the routers console and press CTRL+C
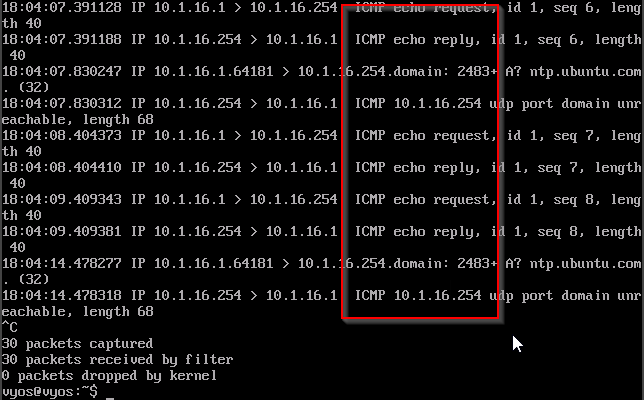
tcpdump allows you to capture network packets the "-i" switch specifies what interface to use, we used eth1. The "ip" switch allowed us to capture all IP packets.
Capture HTTP Traffic
We will relaunch Nmap on our DC10 workstation and run a quick scan on 10.1.16.12.
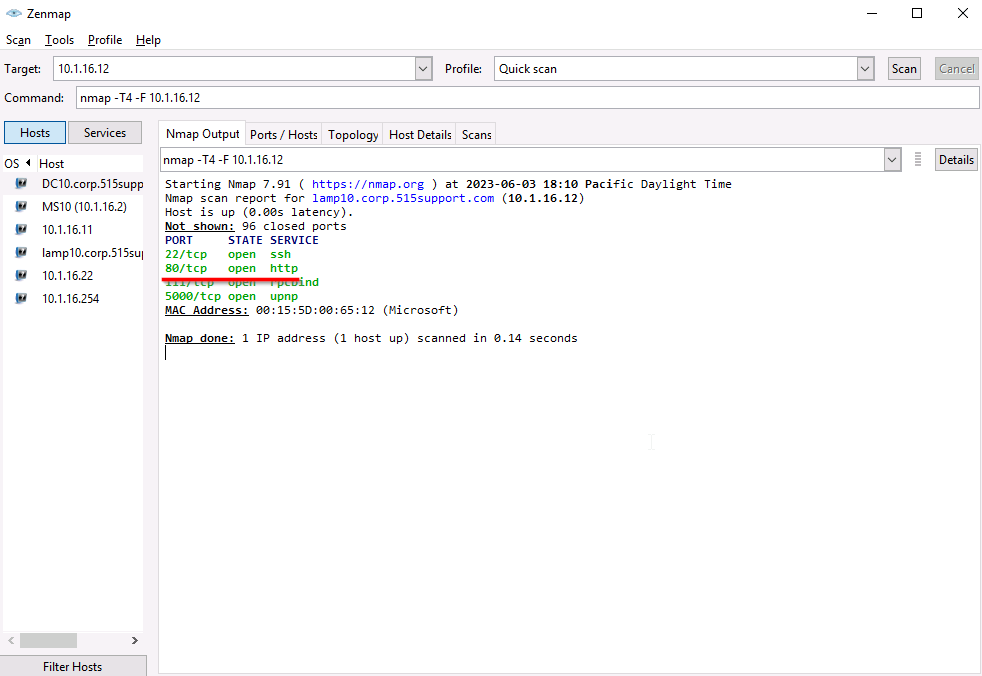
Port 80 HTTP is up and running. Port 80 is a well-known port number used for communication on the internet. It is primarily associated with the Hypertext Transfer Protocol (HTTP), which is the protocol used for transmitting web pages and other resources over the internet.
Open a browser of your choice and type in 10.1.16.12. This will allow you to establish a connection with the lamp server directly through a browser.
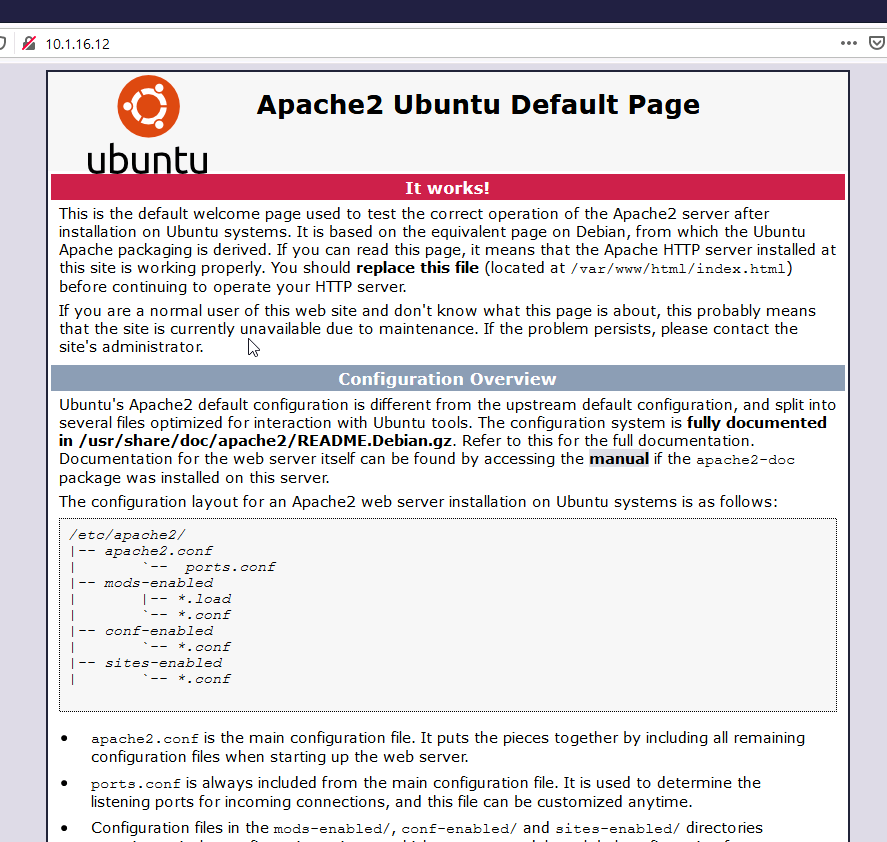
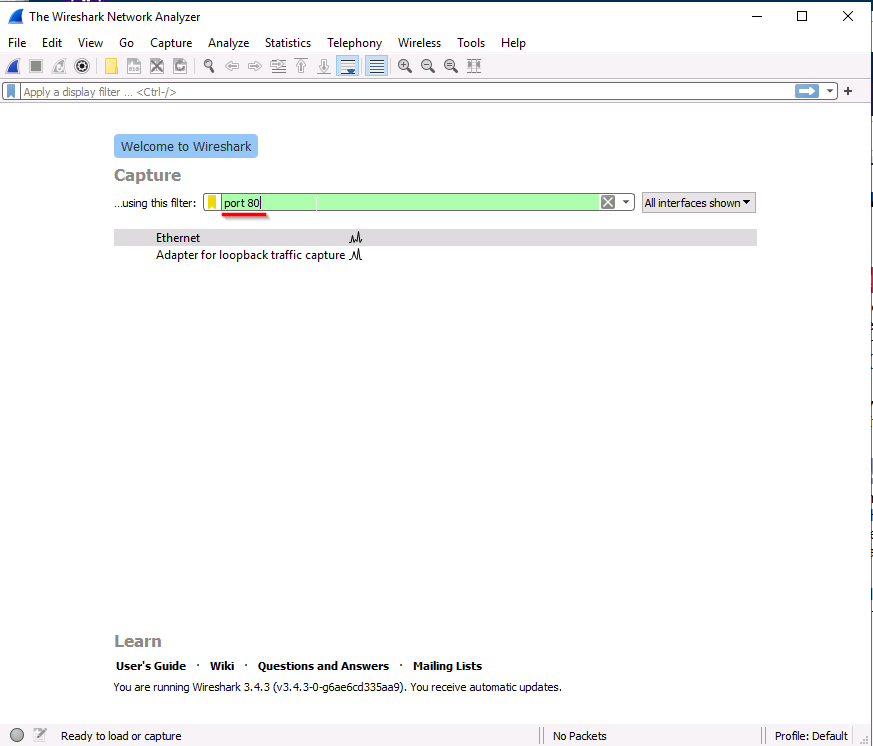
Now open Wireshark and start capturing Port 80 packets. Once started refresh your browser.
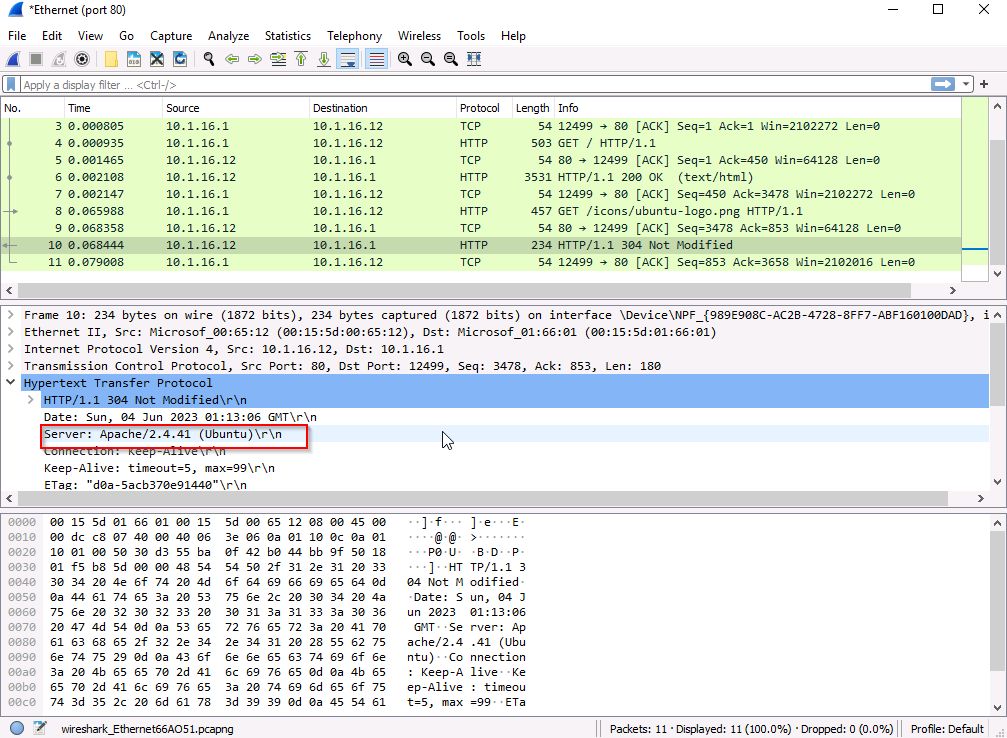
During the investigation, we discovered that the web server is running on Apache/2.4.41. If one were to target the web server for malicious purposes, gathering information about the server becomes the initial step. By doing so, one can identify potential vulnerabilities that the server might have. This reconnaissance phase is crucial in understanding the server's weaknesses and planning appropriate attack vectors or mitigation strategies.
Capture SSH Traffic
We will use Wireshark to capture and analyze SSH packets. Open Nmap and run a quick scan on 10.1.16.12.
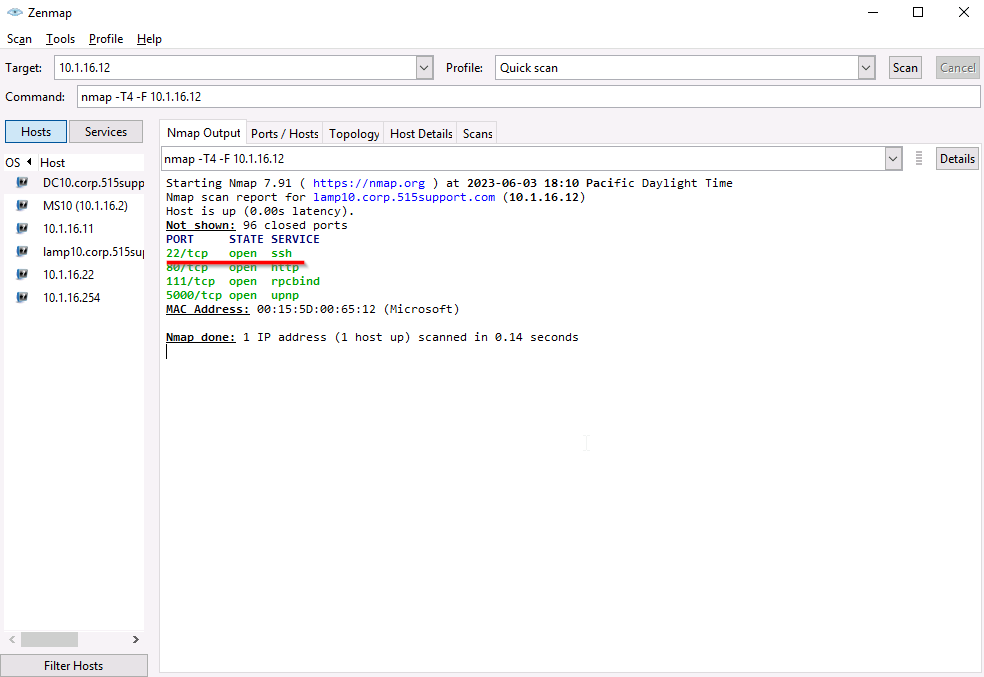
SSH is open, we will SSH into 10.1.16.12 using PUTTY.
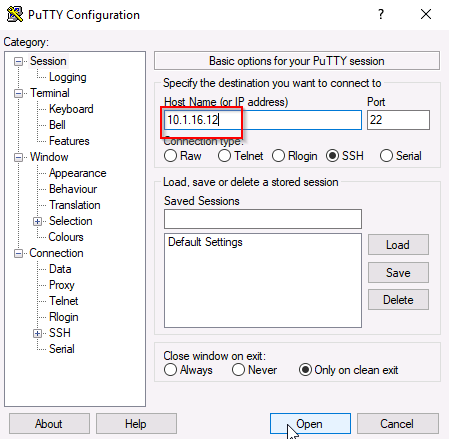
In Wireshark start a packet capture on Port 22.
Once SSH'd in run:
• sudo systemctl restart rsyslog
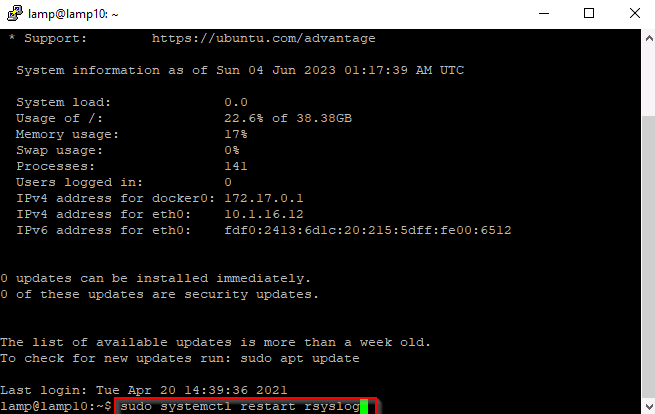
While typing you may notice Wireshark increasing more and more requests. Wireshark is picking up keystrokes being entered. Exit Putty and analyze the packets through Wireshark.
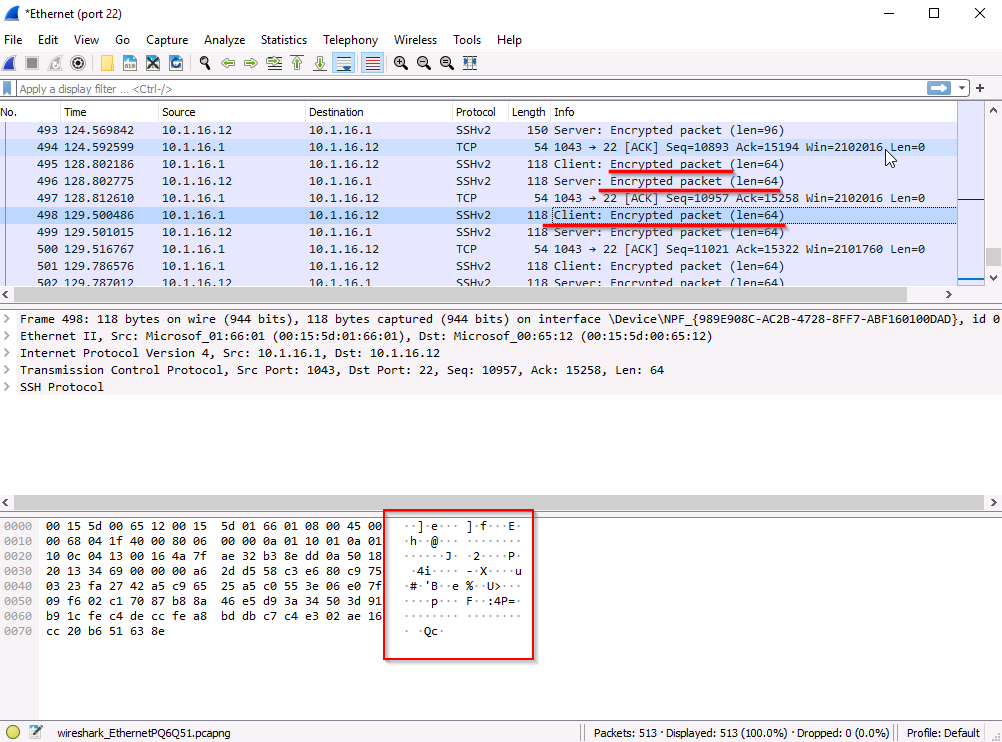
You will observe that it is not possible to directly analyze SSH packets over a wireframe. The reason for this is that these packets are encrypted and cannot be deciphered without the appropriate key. This emphasizes the significance of encryption, as it acts as a protective measure against unauthorized individuals intercepting and accessing sensitive information.