Building-a-Small-Business-Environment

The MSP I work for has been hired to build a small business environment.
The client has requested the following:
• a secure network
• an internal Windows Domain
• a public webserver
• a public FTP server
• a LAN network on 10.128.0.0/24
• a DMZ network on 10.128.10.0/24
• a GUEST network on 10.128.99.0/24
Stage1 : Network Setup : Topology
Our topology will start with the WAN-CLOUD a.k.a. the internet, our WAN-SWITCH, our FortiGate which is our firewall, a LAN-SWITCH, DMZ-SWITCH, and our Windows 10 box.
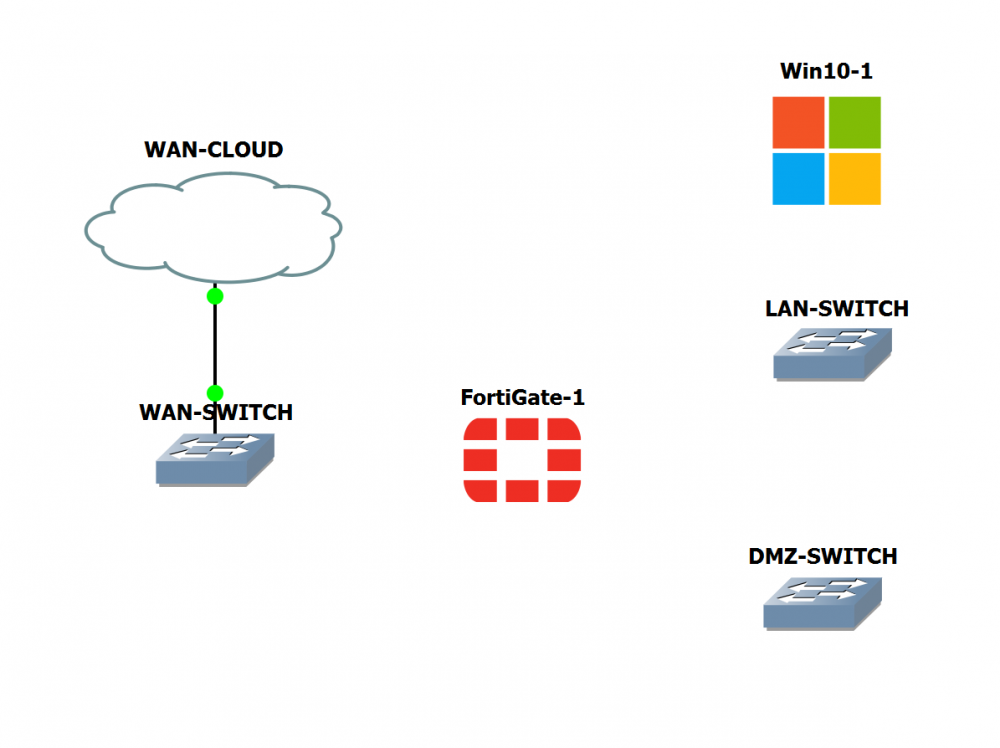
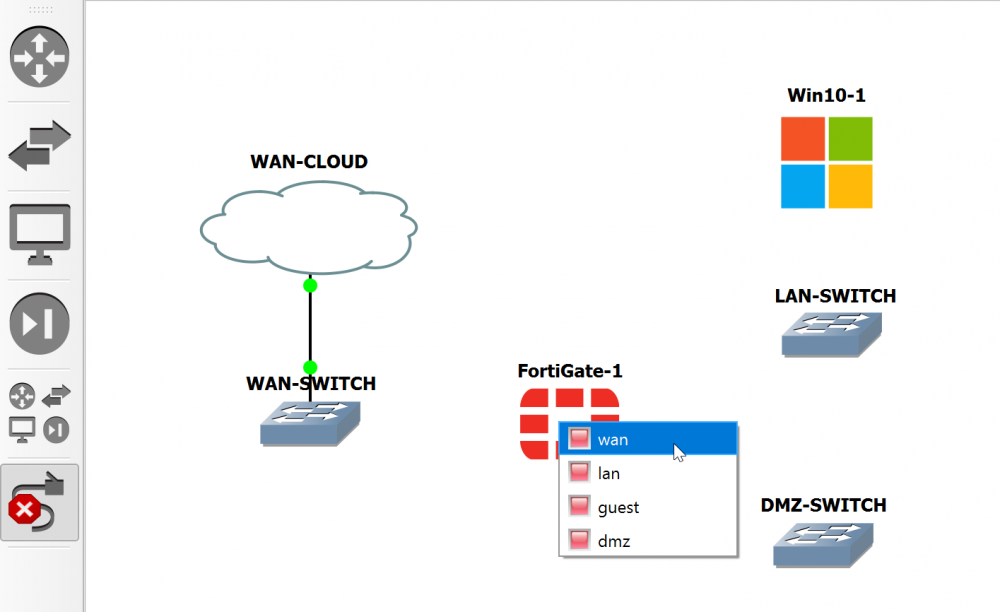
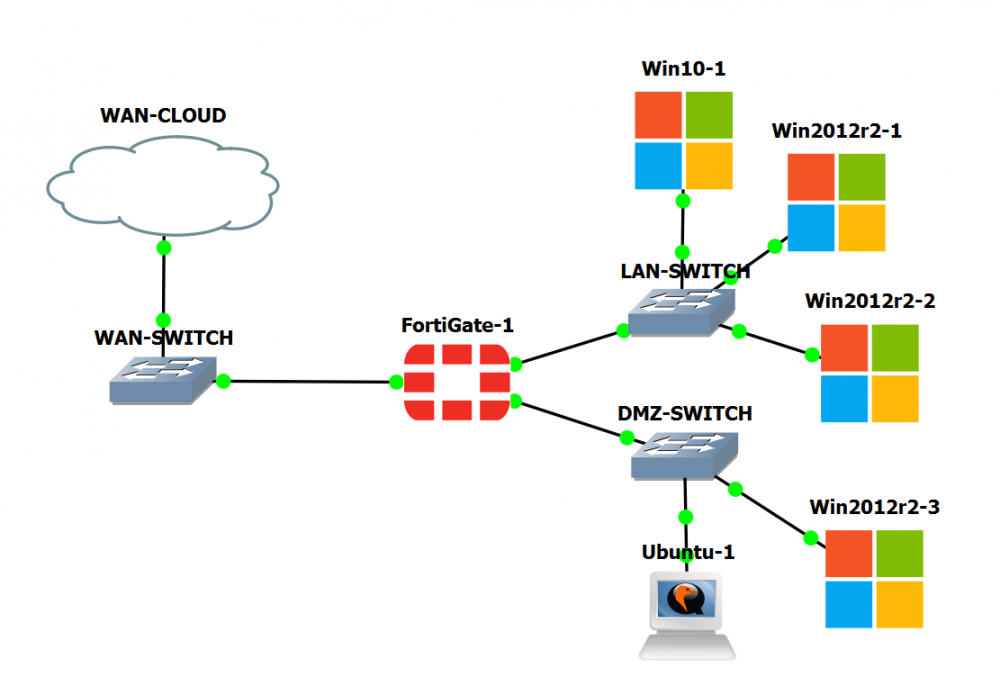
Next we will plug everything in using a RJ-45 cable. Note that with firewalls different ports offer different services. For our FortiGate1 port 1 is for the WAN, port 2 is for LAN, port 3 is for guests, and port 4 is for the DMZ. Switches do not have the same specifications.
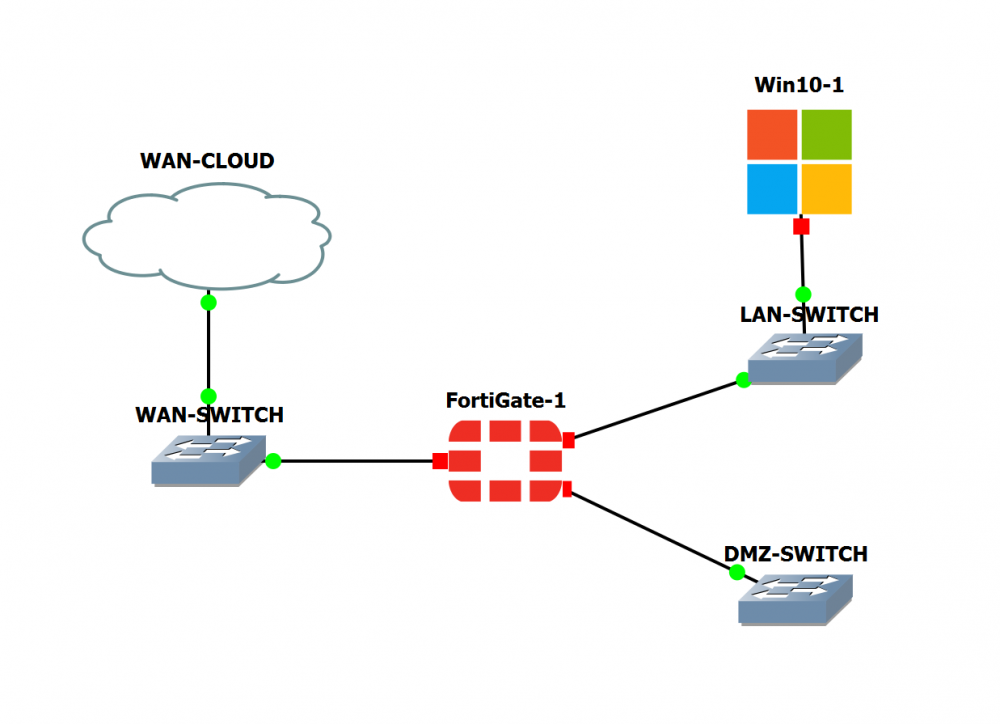
With everything plugged in out topology should look like this:
Stage1 : Network Setup : Configuring the LAN Network
Open up the switch console and log in using the default credentials. username = admin password = none
After loging in you will be prompted to create your own password.
Now we will configure the LAN-Switches settings that we were given to by our senior engineer. Run the following commands:
conf sys int edit port2 set allowaccess ping http https ssh set ip 10.128.0.1/24 end

verify that your configuration is correct by running:
show sys int port2
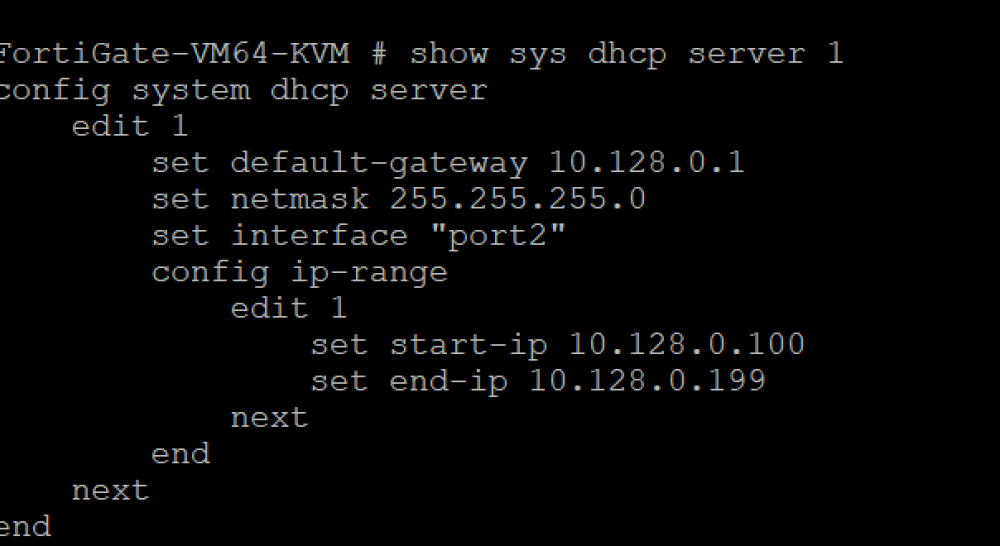
We will now enable DHCP and the LAN Network, our scope is from 10.128.0.[100-199]. we will run:
conf sys dhcp server edit 1 set default-gateway 10.128.0.1 set netmask 255.255.255.0 set interface port2 config ip-range
edit 1 set start-ip 10.128.0.100 set end-ip 10.128.0.199 next end next end
Verify that the configuration is correct by running:
show sys dhcp server 1
Stage1 : Network Setup : Add a Win10 workstation
WAfter spinning up the Windows virtual machine and logging in we will open the command prompt and make sure that our ip, gateway, and DHCP servers are correct by running:
ipconfig /all
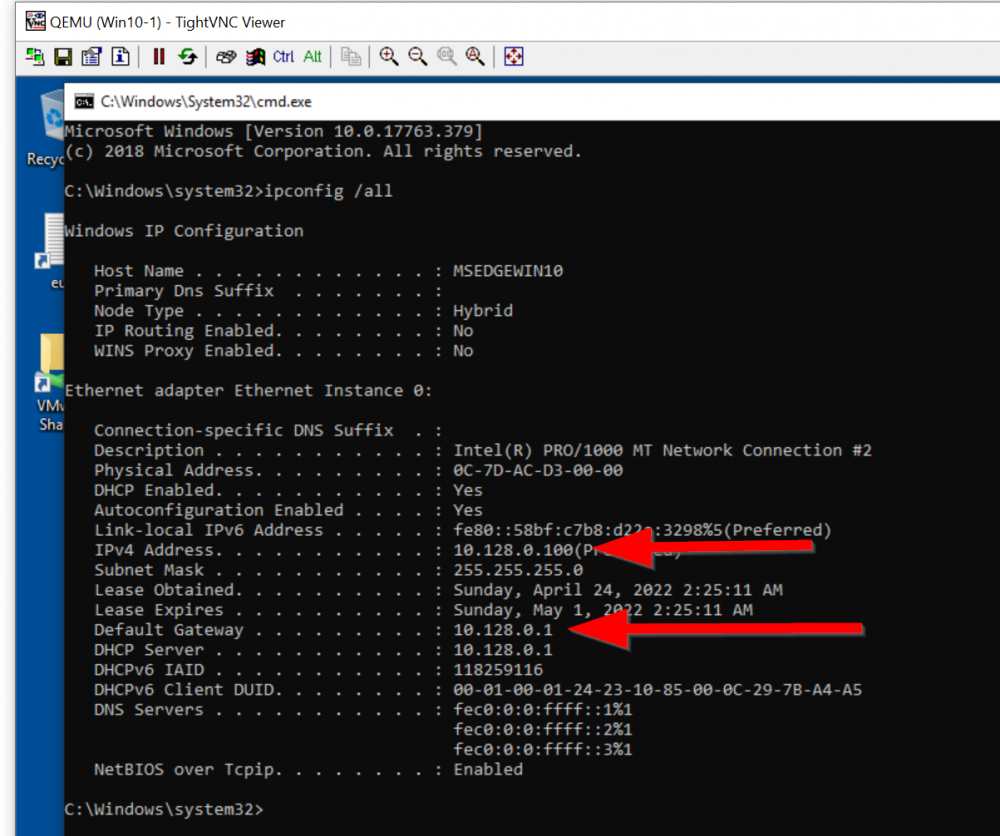
along with the check we will ping: LAN - 10.128.0.1 WAN - 8.8.8.8 DNS - google.com
Our results are that we can ping the LAN with no problem. The WAN and DNS are show as failed or timed out since we haven't configured the settings.
Stage1 : Network Setup : Connect to the firewall GUI
Next we will log into our firewallwall GUI by typing its address into our browser of choice. We will use the same credentials we used to setup our firewall.
Go into the system settings and make changes according to your project. We changed hostnames, timezones, local interfaces. interface lists, idle timeout, and aut file system check. Back up the configuration and reboot the firewall.
Stage1 : Network Setup : Complete the network setup
I will not go into too much detail in all the configurations we made with the firewall so I will sum it up. We reconnected to the gui. Configured the WAN, LAN, GUEST, and DMZ ports. Enabled DNS, Configured the firewall system DNS. Configured Network DNS for LAN, GUEST, and DMZ, Created service objects for LAN, and DMZ. Then we configured firewall rulesfor all the ports. And finally we backed up the configuration.
After all the configurations we re-ran the ping for WAN, and DNS. The WAN came back as successful but the DNS did not. After troubleshooting we found that the configurations were correct, all we had to do was re-run ipconfig /release and ipconfig /renew. Everything worked properly and we were able to connect to the cloud.
Stage2 : Domain Setup : Topology
For stage to we will add and setup our Domain controller.
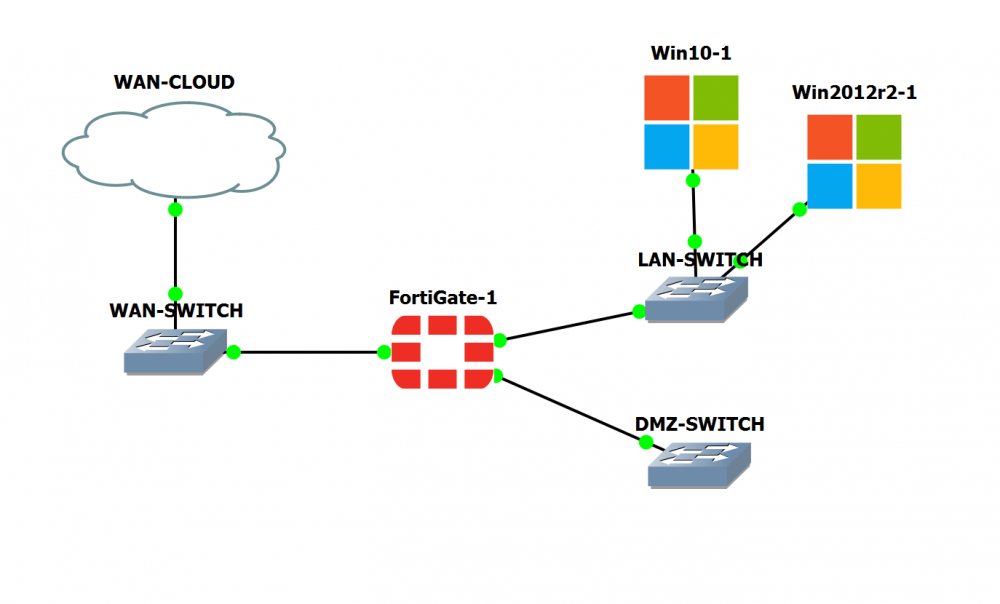
Stage2 : Domain Setup : Prepare a Win2012r2 server
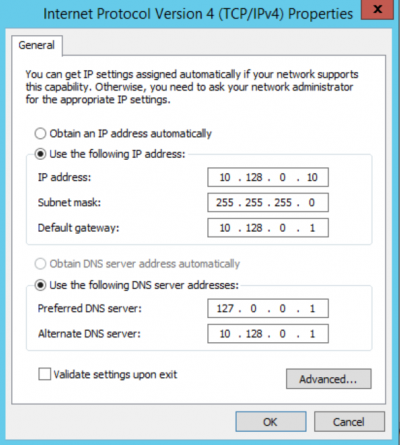
We log into the Win server using default credentials and changing it to something more secured. We will use the following setup our network adapter.
ip address: 10.128.0.10
subnet mask: 255.255.255.0
default gateway: 10.128.0.1
DNS1: 127.0.0.1
DNS2: 10.128.0.1
To change adapter settings go into control panel ‑‑> Network and Internet ‑‑> Network and Sharing Center ‑‑> Change adapter settings ‑‑> Right click your adapter and select properties ‑‑> IPv4 settings.
The final window should look something like this:
To test our connections we will ping the following targets: LAN-SWITCH: 10.128.0.1 WAN: 8.8.8.8 DNS: google.com
All the pings have came back successfull we will sync our time with the switches. Right click the time on the bottom right of the task bar and select Adjust Date and Time. Change the time zone to the same as the switch. Afterwards click internet time and type in the switches ip and hit update now.
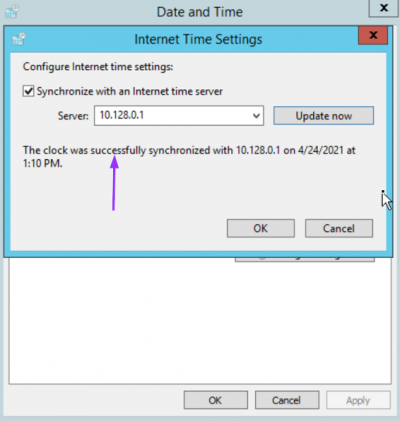
It may not work the first time give it about 3-5 tries before troubleshooting.
Next we will change our hostname
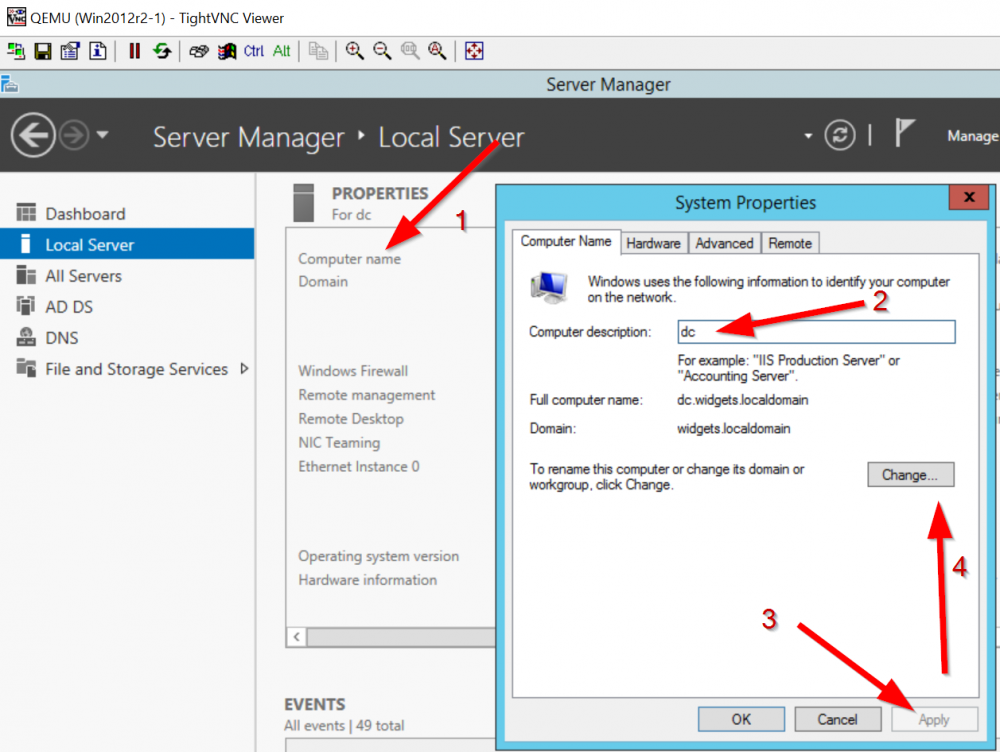
In server manage go into local servers and click the computer name. change the computer description to: DC hit apply then change.
Stage2 : Domain Setup : Install Active Directory
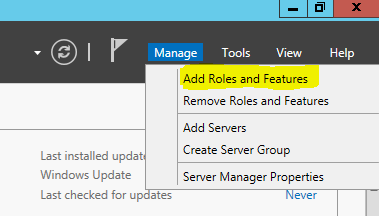
Installing active directory to a Windows web server is really easy. Go into server manager ‑‑> manage ‑‑> Add roles and features ‑‑> Active Directory
Keep the default settings until you reach the server roles tab. Check "Active Directory Domain Services" and continue with the installation. After installation has finished there should be a notification in the server manager asking you to promote the server to the Domain Controller select "yes". If you do not get the notification you may have to refresh the page.
Keep the default settings until you reach the server roles tab. Check "Active Directory Domain Services" and continue with the installation. After installation has finished there should be a notification in the server manager asking you to promote the server to the Domain Controller select "yes". If you do not get the notification you may have to refresh the page.
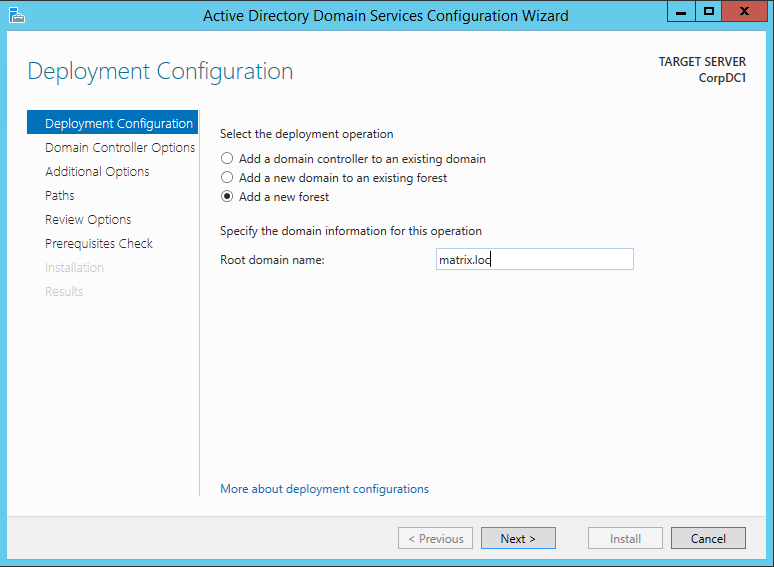
Select the "Add a new forest" option and name your root folder
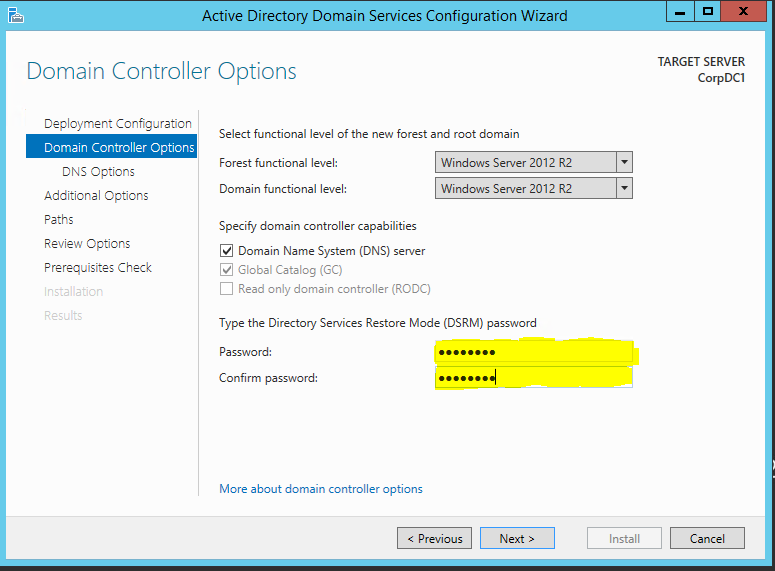
Select "Next" Enter a password and finish the installation. When the installation is finish reboot the device.
Stage2 : Domain Setup : Create new AD users
We created users for our Domain. This allows people who has the credentials to log into a computer in the business environment. Our naming format is as follows:
We will create a admin and user account for Ashley Williams. We will take the first name initial and attatch it to the last name followed by a u- for user and a a- for admin account.
a-awilliams
u-awilliams
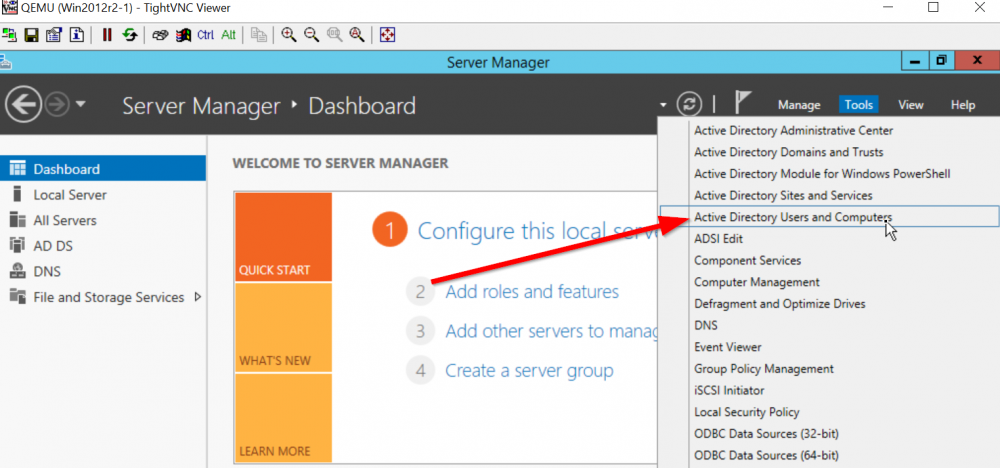
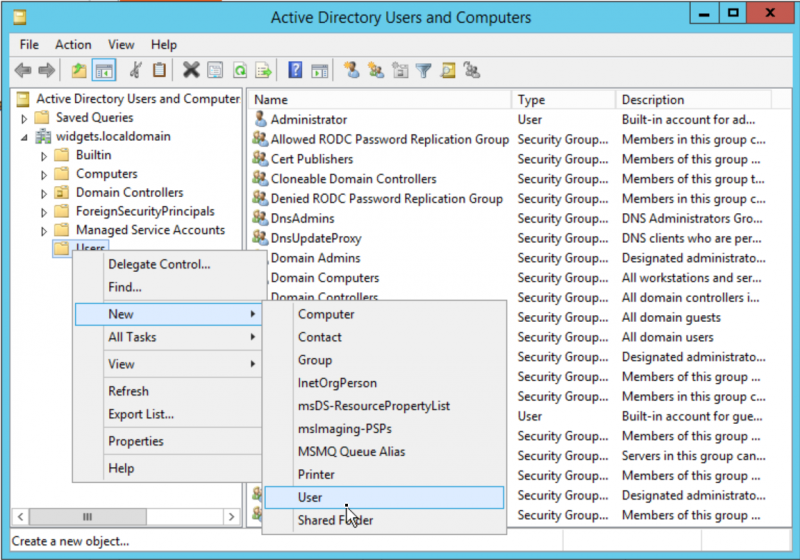
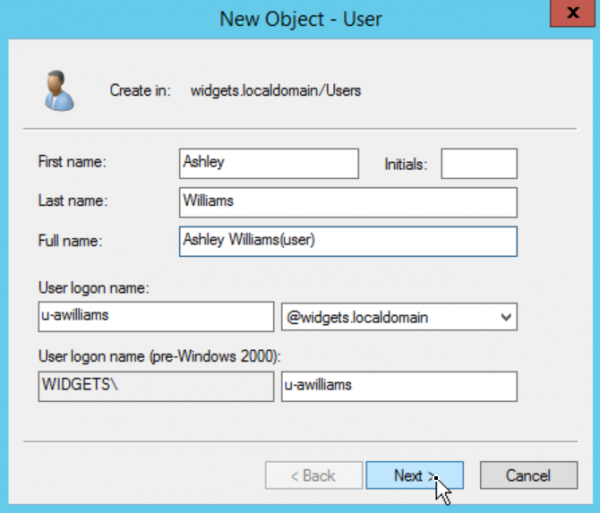
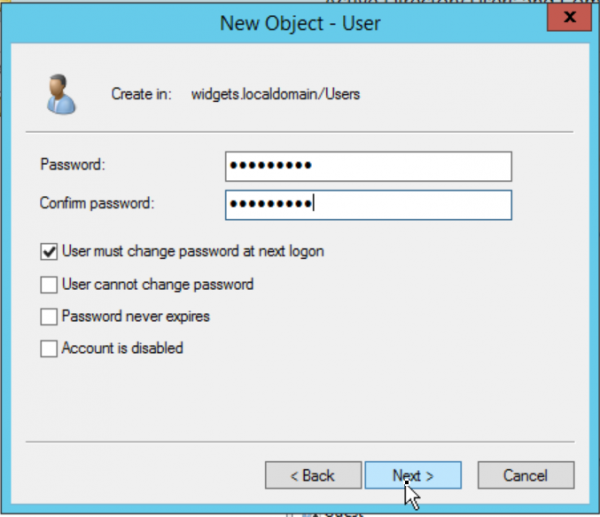
For admin accounts you must add them to the "Domain Admins" group to be able to make administrator changes and installations. Normal users will not have the permisions to change, and install files.
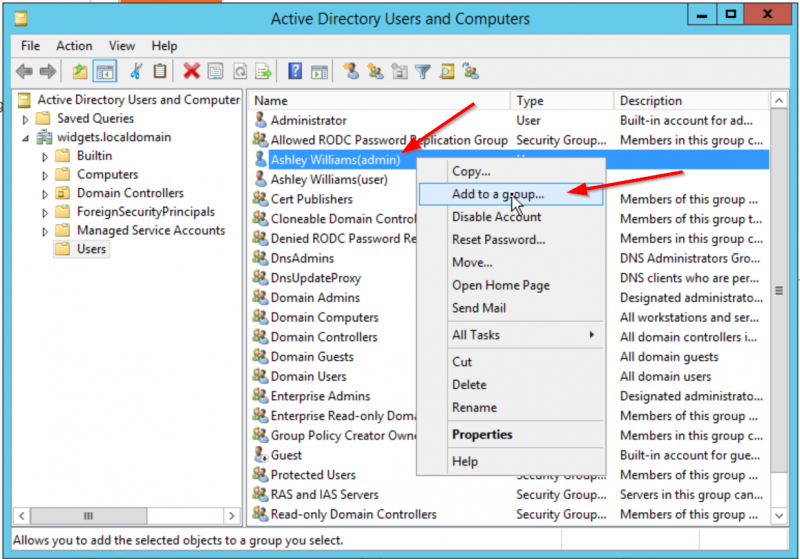
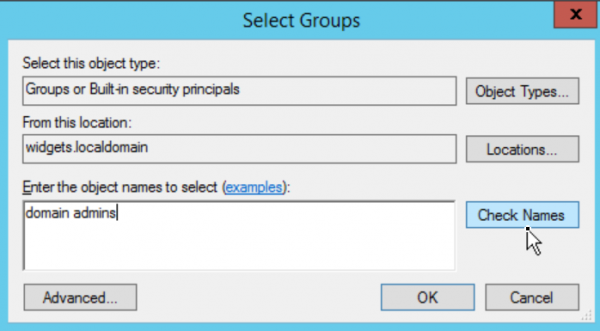
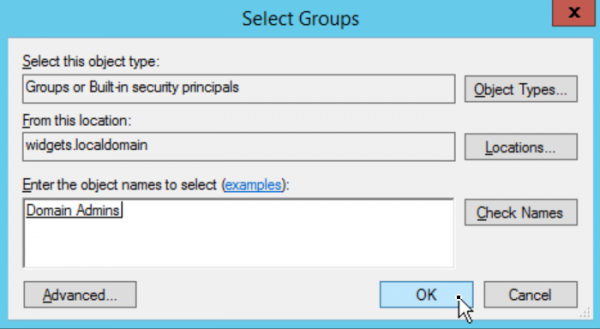
Be sure to check names, windows is Case Sensitive.
Stage2 : Domain Setup : Prepare Win10 to join the domain
In order to prep our windows workstation to join our DC server we must first name the windows 10 pc so we can identify it.
under control panel go to ‑‑> System ‑‑> Change Settings under the system properties we changed the name of our workstation.
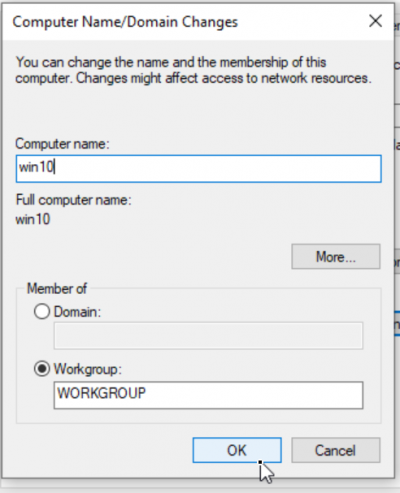
We then went into the our Win10 workstation and changed our IP settings. Our IP address will be obtained automatically through our DC server, and our DNS settings are pointed to our LAN-SWITCH and our DC server.
Our last step is to sync our time with our DC. We changed the time zone to the same time as our DC, then under the Internet Time settings we type in our full Domain Name.
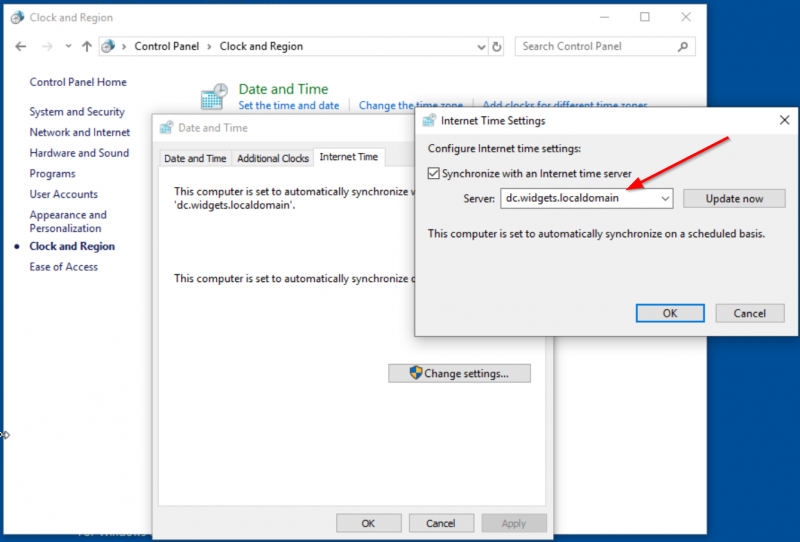
Stage2 : Domain Setup : Join Win10 to the widgets.localdomain domain
To join the domain go back into the settings in which we changed the computer name to win10. Click the domain box and type in the domain name. Afterwards you will get a prompt to login. Use an admin account that you have created.
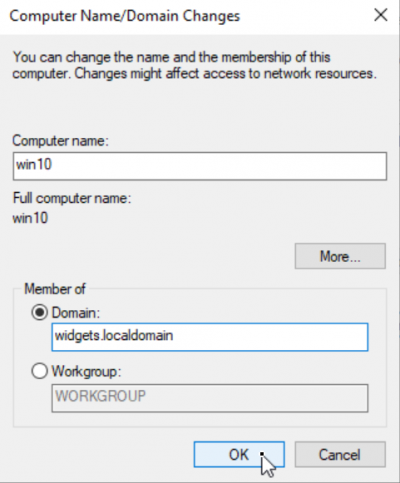
Logout of the windows10 workstation and log back in using a user, or admin account. Our station has been succesfully linked to our Domain Controller.
Stage3 : IIS Setup : Topology
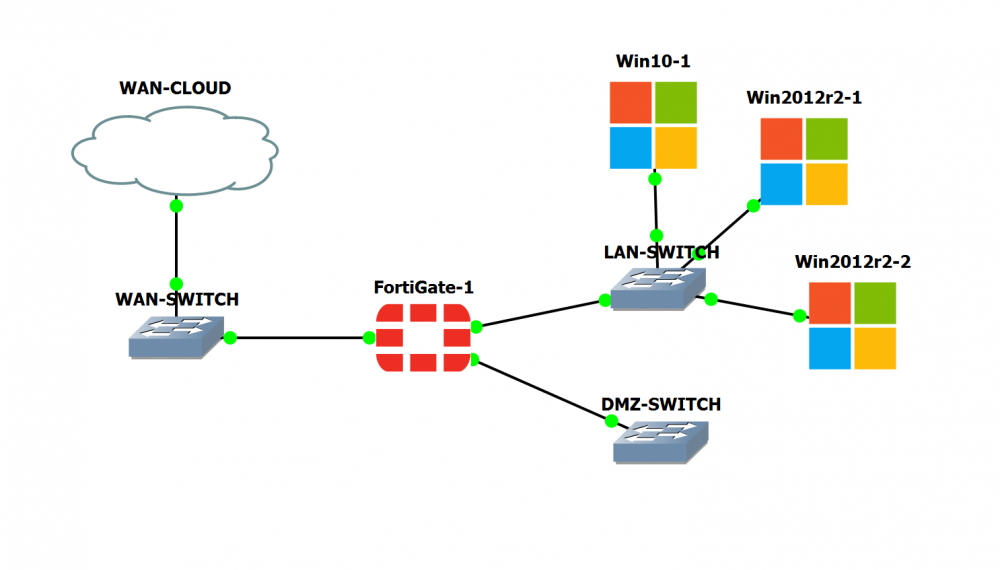
Next we will create a webserver. We will set the device up using IIS (Internet Information Service), it will be connected to our LAN-SWITCH.
Stage3 : IIS Setup : Prepare a Win2012r2 server
We will rename the servers hostname to: iis match the subnet mask with the other devices. Give the device a static ip address. Point the default gateway to the LAN-SWITCH. The DNS will be pointed into the DC and LAN-SWITCH. Synchronize the time with the other devices and join the Domain just like we did for the workstation.
Stage3 : IIS Setup : Install the IIS role
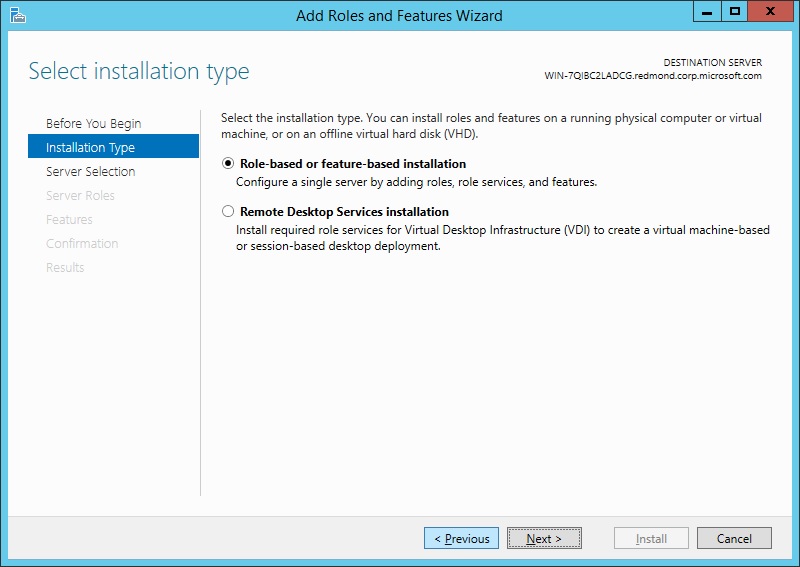
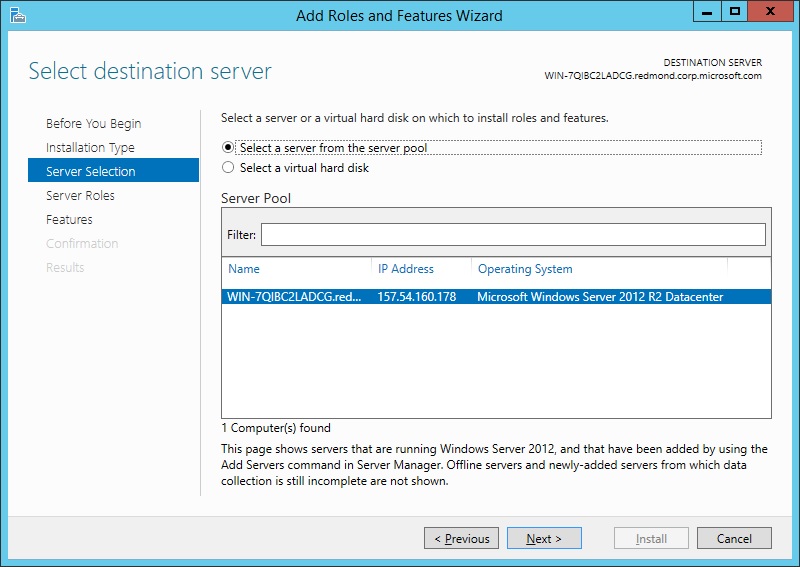
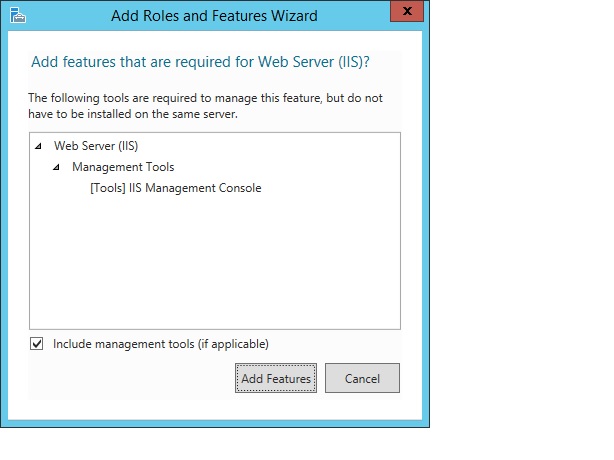
In server manager select # Add roles and features. Select Role Based Installation and hit next. Select the server in which you want to install IIS on. Select IIS Webserver to install and continues with the installation.
.jpg)
Stage3 : IIS Setup : Setup a test webpage on IIS
We will create a test html file to see if our webserver is functioning properly. Here is a simple HTML code we used to test the webserver:
<html>
<head>
<title>IIS test validation website</title>
</head>
<body>
<p>test website validation completed</p>
</body>
</html>
Save the file as "test.html" ! Make sure that the file is not a notepad file that it is actually a HTML file. Save the file to this location " c:\inetpub\wwwroot\test.html "
You can test to see if your browser can open the file on the local iis server by typing "http://localhost/test.html" in the browser.
You can test to see if other workstations in the business environment can access the file by loging into a workstation and typing http://iis.widgets.localdomain/test.html into the browser.
Stage4 : LAMP Setup : Topology
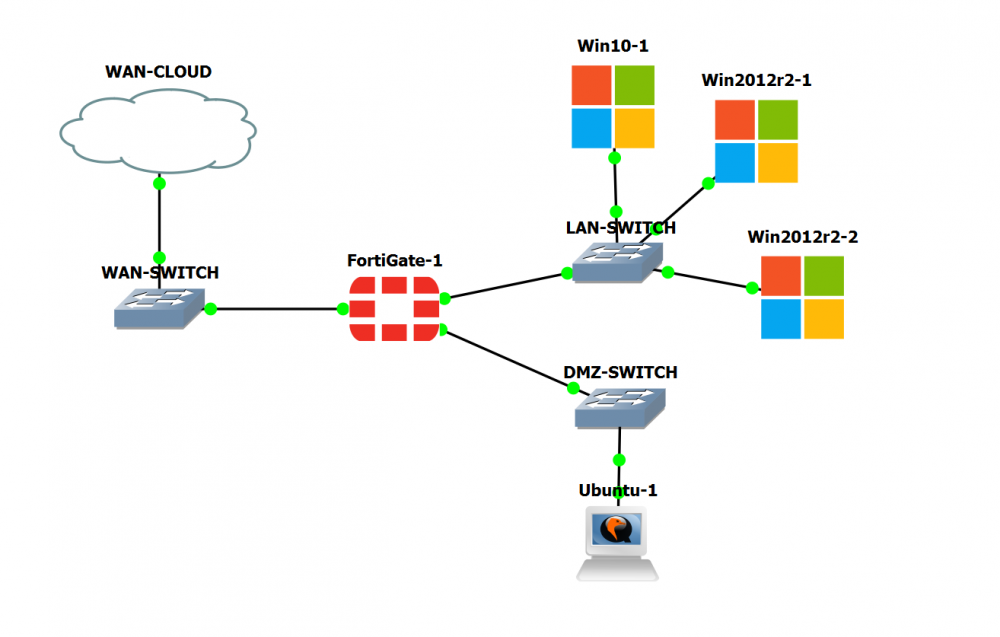
Now we will setup a LAMP webserver on Unbuntu server on the DMZ-Network"
Stage4 : LAMP Setup : Prepare a Ubuntu server
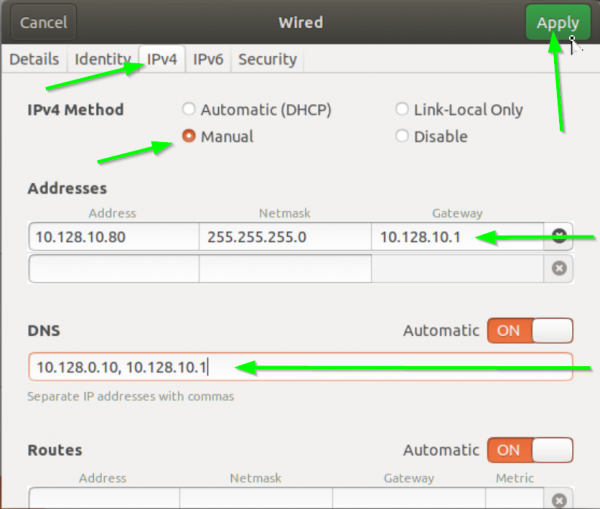
We gave our Ubuntu server a static ip of 10.128.10.80 same as our iis server but on another network. Our subnet mask will be the same. the default gateway will point towards the DC. our DNS settings will point towards the DC and our DMZ-SWITCH.
We will now edit our host files. This takes root privileges run: sudo -i then run: nano /etc/hosts to edit the host files.

We will now add in our local hosts
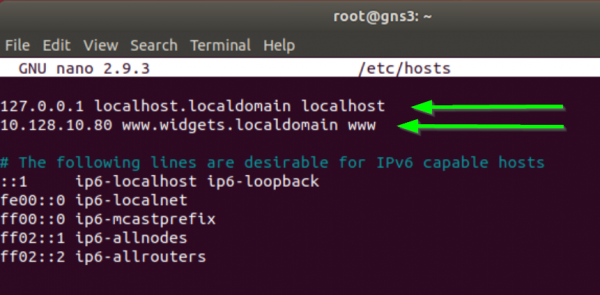
Save and exit.
We will now change the servers hostname run:
hostnamectl set-hostname www
hostnamectl
This sets how hostname as www and checks to make sure we set our hostname correctly right.
Lastly we run our package updates on the server. This may take a few minutes to a hour. Run:
apt update -y
apt upgrade -y
apt dist-upgrade -y
apt autoremove -y
apt autoclean -y
systemctl reboot
Stage4 : LAMP Setup : Install DokuWiki
Im not going to lie this is a long step so imma just give you the code to what we did without to much explaining lmaoo. ALSO you must be root for this section.
We ran this command to install dokuwiki
apt install php php-gd php-xml php-json -y
systemctl enable --now apache2
ufw allow Apache
wget https://download.dokuwiki.org/src/dokuwiki/dokuwiki-stable.tgz
mkdir /var/www/html/dokuwiki
tar xzf dokuwiki-stable.tgz -C /var/www/html/dokuwiki/ --strip-components=1
Basically the code is installing neccesary packages first, enabling a service apache2, allowing apache through the firewall, downloading dokuwiki, setting up a folder for dokuwiki, then extracting the contents into the folder.
We than ran:
nano /etc/apache2/sites-available/dokuwiki.conf
This will be our configuration file for dokuwiki.
Our config file looks like this:
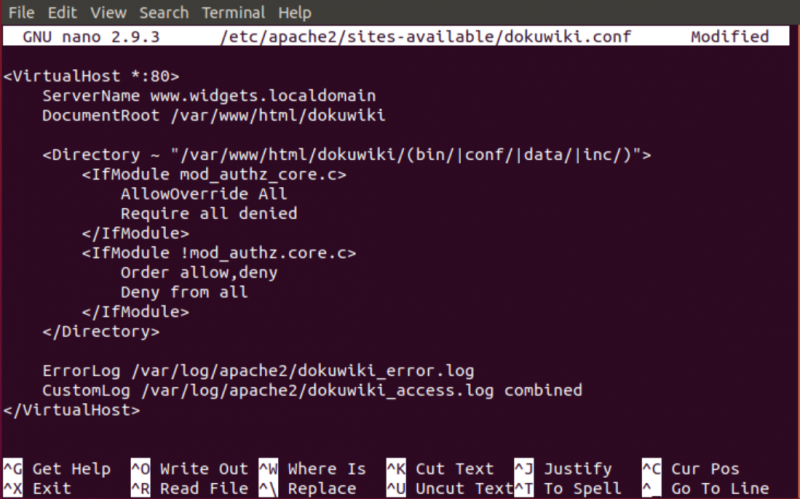
These commands finishes and solidifies the configuration.
cp /var/www/html/dokuwiki/.htaccess{.dist,}
chown -R www-data:www-data /var/www/html/dokuwiki
apache2ctl -t
a2dissite 000-default.conf
a2ensite dokuwiki.conf
systemctl reload apache2
Now you want to log into the DC server and in server manager open the DNS settings. Under the "Forward Lookup Zones" add a new host(A) record to the domain:
name = www ip address = 10.128.10.80 create associated pointer (PTR) record = unchecked add host
You can now run in the browser of your choice:
http://www.widgets.localdomain/install.php
Stage4 : LAMP Setup : Configure DokuWiki
Configure Dokuwiki to your liking. Afterwards rename the dokuwiki file run:
mv /var/www/html/dokuwiki/install.php /var/www/html/dokuwiki/install.php.removed
Then onto the browser enter:
http://www.widgets.localdomain/
log in using the credentials you used for the setup and you will be brought to a page with a few options. Select "Create this page".
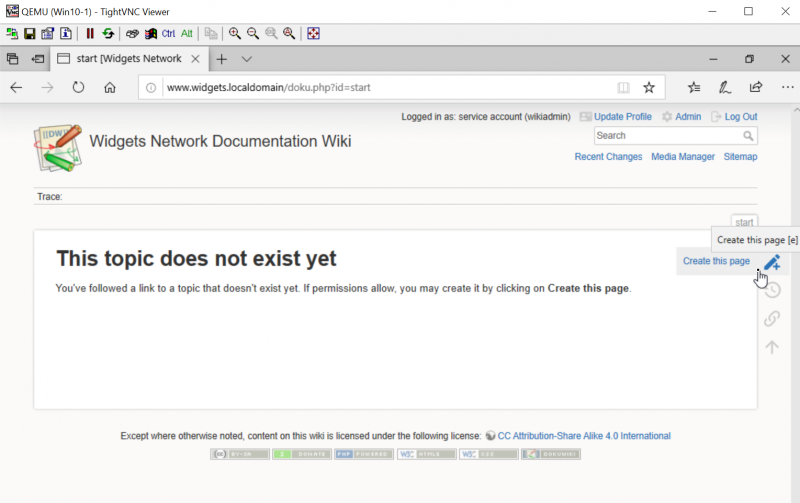
for our page we documented each node with its IP, FQDN, hostname, a-records, what ports they are plugged into, and if they are static or dhcp connected.
Stage4 : LAMP Setup : VIP setup
We will now make this page visible to everyone on the WAP. Log into the firewall gui and create a new virtual ip.
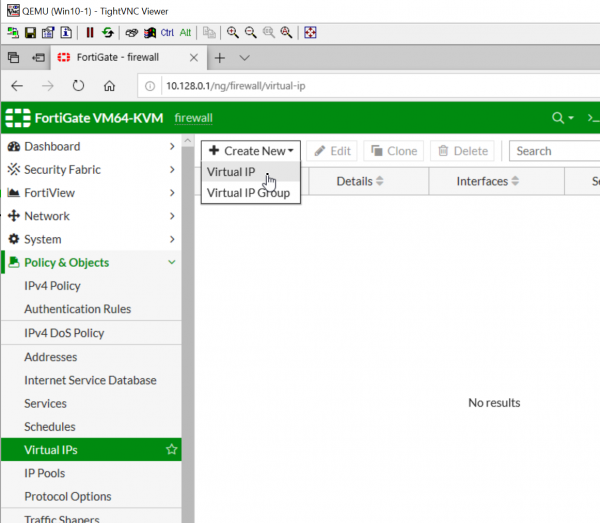
Configure the firewall to your liking but make sure the ip matches the iis and www servers, and select you interface to WAN settings.
Note the WAN IP of the firewall will be dynamic and may change from time to time. In the firewall console run: show sys int (space) !!!! hold shift and the ? and it will give you the public firewall address.
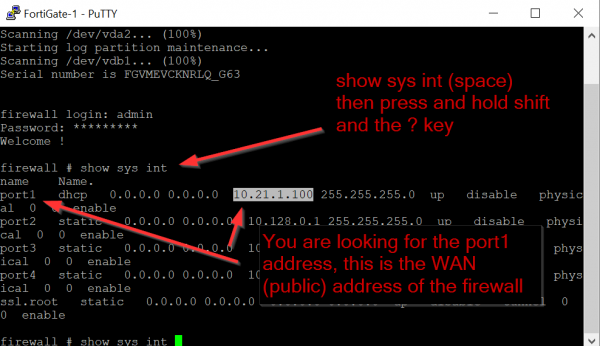
With any computer over the WAN type in the ip of the WAN into the browser and the dokuwiki page with all the network information will pop up.
Stage5 : FTP Setup : Topology
Last server we will add will be the FTP server. It will be attatched to the DMZ-SWITCH. This will allows users on the net to transfer files.
Stage5 : FTP Setup : Install the FTP service
Log into the FTP server using the admin credentials you have created.
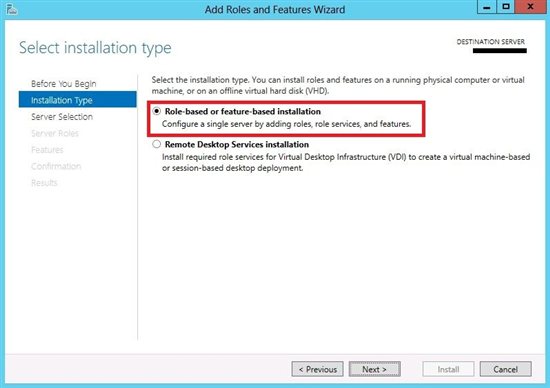
In Server Manager go to Manage ‑‑> Add Roles and Features ‑‑> Role-based Option and hit Next.

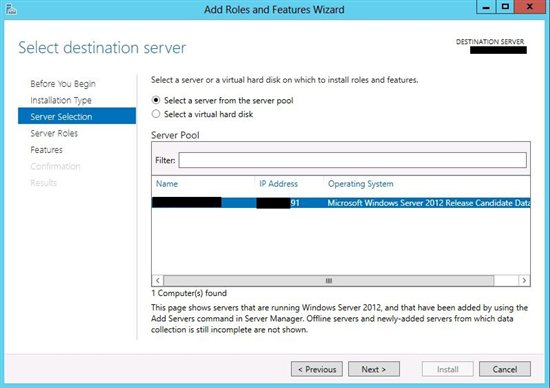
Select the server In which you want to install on.
Select "Webserver (IIS)" and Add Features hit "Next" until you reach the Web Server Role section.
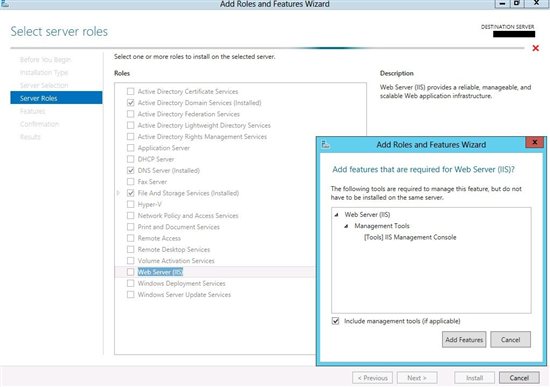
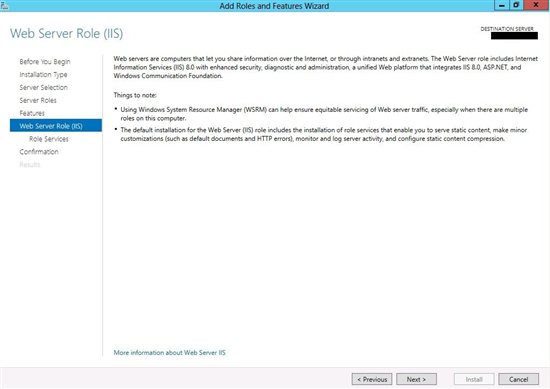
Check the FTP Services to install the packages.
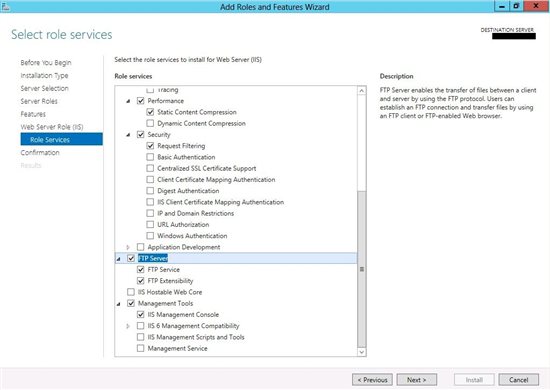
Install and Restart the station.
Now open "Internet Information Service".
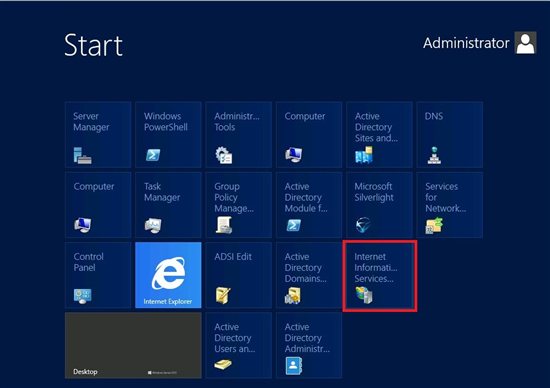
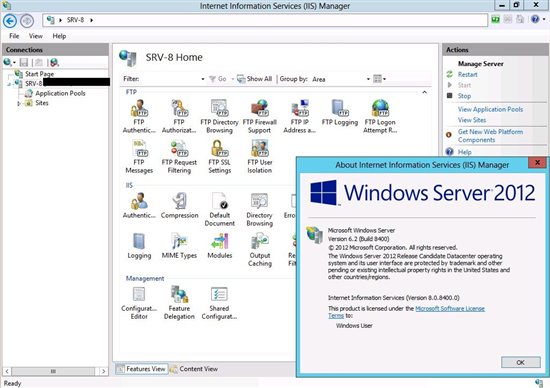
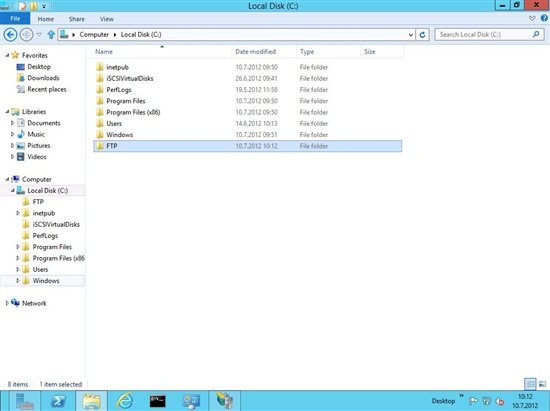
In your C: Drive create a FTP folder and place in some content. We are doing this to ensure other workstations can access our FTP server.
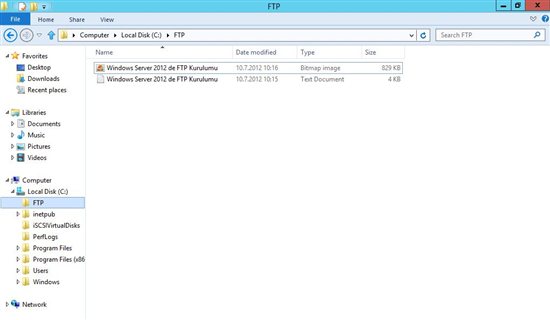
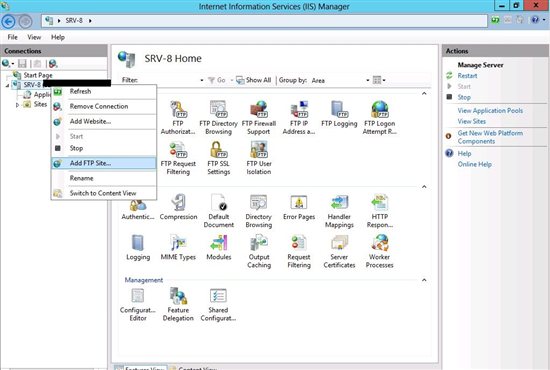
Right Click the Server in the IIS manager and select "Add FTP Site"
Enter a server name of your choice and direct the file path to the FTP folder we made in the C: drive.
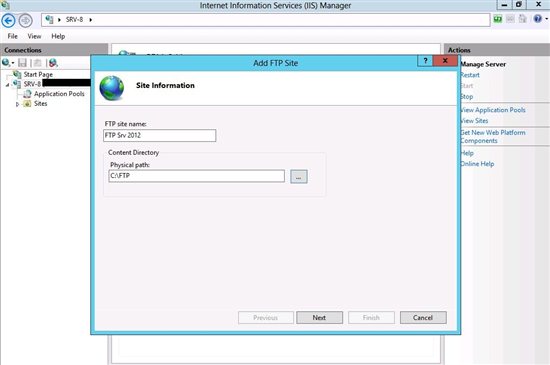
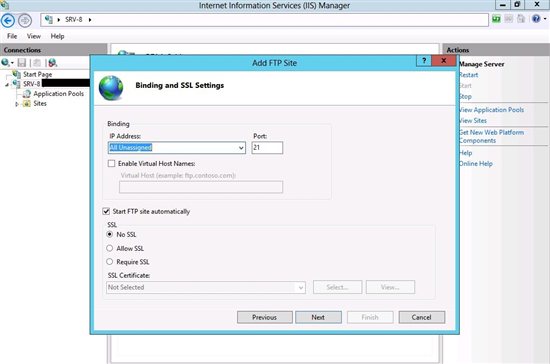
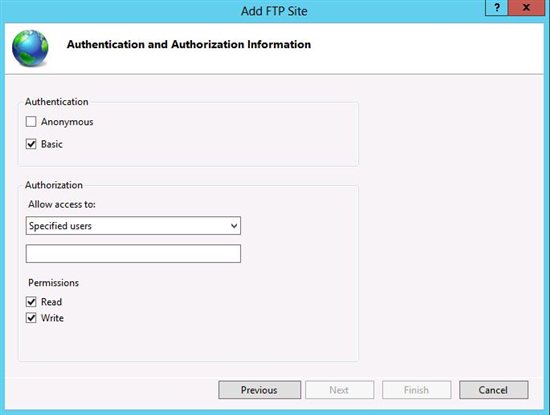
We now switch over to the Domain Controller. Under Server Manager access the "Active Directory Users and Computers" tab. Open the forest and right underneath "Users" Add a new folder a name it "FTP" to group users. We will then add all accounts and group them into the FTP group so everyone has access to the files.
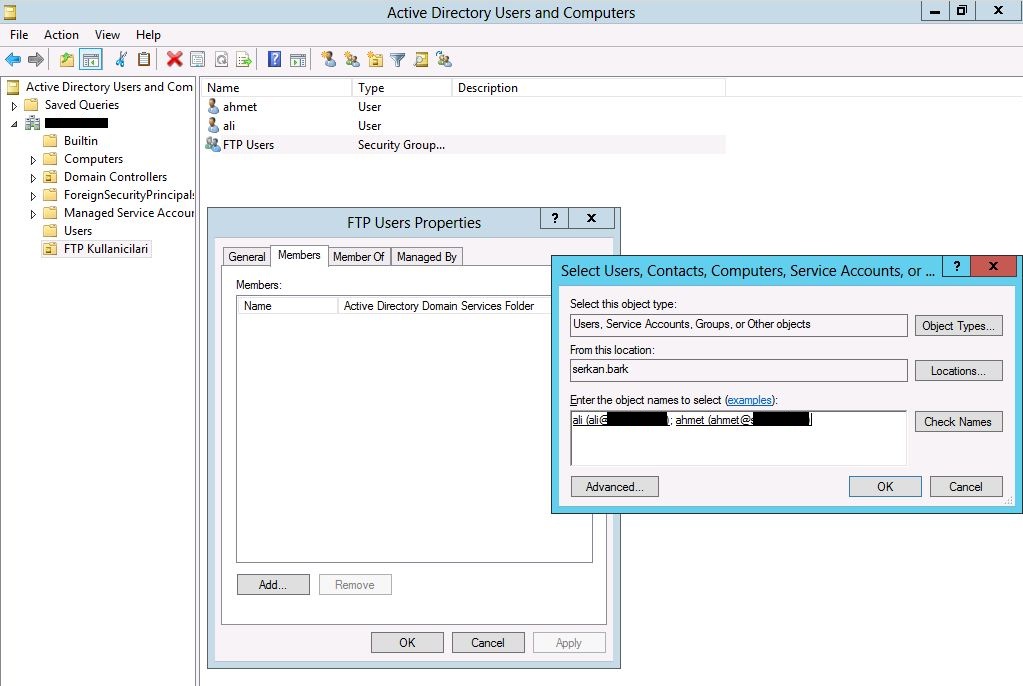
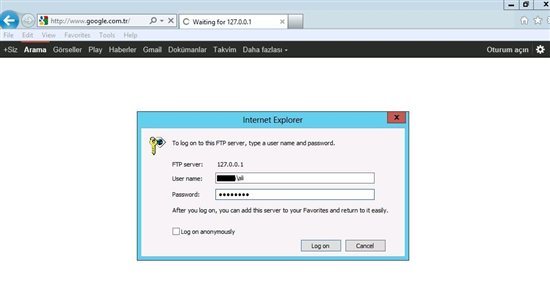
You can test the FTP server by typing ftp//ftp.widgets.localdomain or the FTP's IP. You will be given a prompt. Login using your admin credentials.
You will then be directed to the FTP folder.

Lastly we added the A records for our FTP server. We also changed the firewall settings on inbound to allow connections over port 21 over domain, private, and public networks.